If you are sending or forwarding emails from your own server, then it is very important and nearly mandatory to setup DKIM (DomainKeys Identified Mail).
DKIM is a method of signing emails digitally with public-key cryptography so that the receiver of the email can validate and verify that the email was indeed send and authorised by the actual domain that the email claims to be coming from.
This allows the verification of authenticity of the email which is then used to fight email spam by the receiver. Since DKIM proves authenticity of the email, it is also used to build trust and allow the receiver to identify legitimate non-spam senders and allow their emails to reach the inbox, instead of the spam box.
OpenDKIM
OpenDKIM is a free and open source implementation of the DKIM standard that can be integrated with postfix very easily.
In this article we shall go through the steps of how to setup and configure opendkim with postfix on ubuntu or debian. The same set of instructions should work for other linux distros based on debian or ubuntu as well.
Before we proceed with setting up opendkim we must have postfix setup properly. We already covered the basics of how to setup postfix on ubuntu/debian in a previous article here:
Install Postfix mail server and Dovecot on Ubuntu or DebianInstall opendkim
All the necessary packages for opendkim are already available in the default ubuntu repositories. You just need to run the apt command to install it.
sudo apt-get install opendkim opendkim-tools
The following are the package details if you want to know further.
# aptitude search opendkim
p   libopendkim-dev                                          - DomainKeys Identified Mail (DKIM) library (development files)
i A libopendkim11                                            - DomainKeys Identified Mail (DKIM) library
i   opendkim                                                 - DomainKeys Identified Mail (DKIM) signing and verifying milter
i   opendkim-tools                                           - utilities for administering the OpenDKIM milter
#
Configuration steps: After installation, it needs a couple of steps to configure properly. There are multiple steps, but its not really complicated if you can spare about 20 minutes.
- Setup opendkim config file /etc/opendkim.conf
- Generate encryption key
- Setup and configure KeyTable File
- Setup and configure SigningTable File
- Setup Postfix Milter
- Setup the DNS records
- Wait and verify dkim dns records
- Send test mail!
Setup Config
After installing the opendkim packages, the next task is to configure a bunch of files according to our email setup. OpenDKIM has a configuration file located at /etc/opendkim.conf where you need to do some modifications. Edit it using nano.
nano /etc/opendkim.conf
Scroll down to the bottom of the config file and add the following statements.
# Our OpenDKIM config statements

# Log to syslog
Syslog                  yes
SyslogSuccess           yes
LogWhy                  yes
# Required to use local socket with MTAs that access the socket as a non-
# privileged user (e.g. Postfix)
# UMask                   002

Mode                    sv
# PidFile                 /var/run/opendkim/opendkim.pid
UserID                  opendkim:opendkim
Socket                  inet:12301@localhost

Canonicalization        relaxed/relaxed
SignatureAlgorithm      rsa-sha256

# Sign for example.com with key in /etc/opendkim.d/mail.private using
# selector 'mail' (e.g. mail._domainkey.example.com)
# Domain                  example.com
# KeyFile                 /etc/opendkim.d/mail.private
# Selector                mail

ExternalIgnoreList      refile:/etc/opendkim.d/TrustedHosts
InternalHosts           refile:/etc/opendkim.d/TrustedHosts

# must not use refile, or you get error

KeyTable                /etc/opendkim/KeyTable
SigningTable            refile:/etc/opendkim/SigningTable
A list of all supported configuration option along with a brief description can be found here: http://www.opendkim.org/opendkim.conf.5.html
Here is a quick explanation of some of the configuration statements:
- KeyTable: Path to file mapping key names to signing keys. If present, overrides any KeyFile setting in the configuration file
- SigningTable: Path to file with table used to select one or more signatures to apply to a message based on the address found in the From: header field.
Note: "refile" means the file is using regular expressions. So you should use it accordingly.
Restart OpenDKIM: After making changes to configuration file, restart the opendkim daemon with the service or systemctl command.
service opendkim restart

systemctl restart opendkim
OpenDKIM port: You can use the netstat command check the opendkim open port like this:
# netstat -nltp | grep opendkim
tcp        0      0 127.0.0.1:12301         0.0.0.0:*               LISTEN      268403/opendkim
#
12301 is the default port number for opendkim. You can change it to something else in the above shown configuration file if you want.
The running process for opendkim can be checked with the ps command
ps aux | grep dkim
Generate Keys
First you need to generate the encryption keys that will be used to add encrypted signatures on the email being sent out. The directory being used here is /etc/opendkim/keys/ and inside this directory we create a sub-directory for each domain for which we are creating opendkim keys.
This allows for better organisation of files and easier management. The location of the key files can be anything you like. For instance you can put the keys in the /opt directory if you wish to to keep a separation between configuration files and software files.
You just need to specify the correct path in the configuration later on.
Use the opendkim-genkey command to generate the key for a particular domain.
# opendkim-genkey -v -b 2048 -d example.com -D /etc/opendkim/keys/example.com -s mail
opendkim-genkey: generating private key
opendkim-genkey: private key written to mail.private
opendkim-genkey: extracting public key
opendkim-genkey: DNS TXT record written to mail.txt
root@173-255-230-5:/etc/opendkim/keys#
You have to first create the directory /etc/opendkim/keys/example.com with the mkdir command.
root@173-255-230-5:/etc/opendkim/keys# mkdir example.com
Fix file ownership: Change ownership of the key files and folder to user "opendkim". This allows opendkim to be able to read the key files. While creating the keys we are most likely working with the root user account, therefore all folders and files are created with root ownership. Hence the ownership needs to be changed.
chown opendkim:opendkim example.com/
chown opendkim:opendkim *
Inside the keys directory you should typically have a sub-directory for each domain, like the following. You can have to add each domain for which you are forwarding emails.
root@173-255-230-5:/etc/opendkim# cd keys/
root@173-255-230-5:/etc/opendkim/keys# ls
example.com  helloworld.com
root@173-255-230-5:/etc/opendkim/keys#
Inside each of the sub-directory you would see 2 files. One will be a .private and another will be a .txt file.
The .private file consists of the private key used to sign the email with encryption. The .txt file contains the public key that you need to publish publicly via the dns records of the domain.
root@173-255-230-5:/etc/opendkim/keys# ls example.com/
mail.private  mail.txt
root@173-255-230-5:/etc/opendkim/keys#
Setup KeyTable File
Once the keys are generated, the /etc/opendkim/KeyTable file needs to be updated with the correct locations for the private key file. If the KeyTable file does not exist on your system you need to create it manually.
The location of the KeyTable file itself does not matter, you just need to specify the correct location in /etc/opendkim.conf file.
You need an entry in KeyTable for every domain for which you are receiving/forwarding emails on a particular server. Here is how a typical KeyTable file could look like.
root@173-255-230-5:/etc/opendkim# cat KeyTable

# $sender-pattern:$signing-domain:$keypath
mail._domainkey.example.com example.com:mail:/etc/opendkim/keys/example.com/mail.private

# Key for another domain
mail._domainkey.example.net example.net:mail:/etc/opendkim/keys/example.net/mail.private
Note very carefully the domain name followed by the selector. If you miss the selector, it will not work. The format of each line is like this:
KeyID DomainName:Selector:FullPathToPrivateKey
Setup SigningTable File
After key table file, the next file to setup is the SigningTable file which tells opendkim which KeyId to use for a particular email address. The location is
Again you need a separate entry in this file for each domain/key ID. Here is how the file would typically look.
root@173-255-230-5:/etc/opendkim# cat SigningTable

*@example.com mail._domainkey.example.com

*@example.net mail._domainkey.example.net
So basically when your system sends a mail from "[email protected]" as the source address, opendkim will check the key id from the SigningTable and then using the key id will select the private key file path from the KeyTable file, and then use the private key to put an encrypted signature.
Setup TrustedHosts file
The trusted hosts file is used to specify the hosts for which opendkim will do signing. The file uses regex syntax, hence you should specify "refile:/" when writing its path in the opendkim configuration file.
Here is how it may look like.
# cat /etc/opendkim/TrustedHosts
127.0.0.1
::1
localhost
192.168.0.1/24

*.example.com
*.example.net

#*.example.org
root@173-255-230-5:/etc/opendkim#
Note that the TrustedHosts file is used in 2 different configuration parameters in the opendkim configuration file:
ExternalIgnoreList      refile:/etc/opendkim.d/TrustedHosts
InternalHosts           refile:/etc/opendkim.d/TrustedHosts
Since the file is referenced by InternalHosts parameter as, opendkim will consider these hosts (example.com here) as internal and sign outgoing mails from these hosts.
This is necessary if this server is acting as a "RELAY" and the mails being send out are actually originating from another machine on the network or a some desktop mail client like thunderbird.
If the mails are only originating from this particular server where opendkim is running, then you can skip adding them to the TrustedHosts list, since 127.0.0.1 will anyways sign all mails.
Forwarded mail signing: The host 127.0.0.1 which is localhost is getting added to the InternalHosts list. This ensures that all mail originating for local machines are signed which includes messages that are being forwarded.
The ExternalIgnoreList configuration will note that entries in the TrustedHosts file and opendkim will skip validation for incoming mails from these domains or hosts.
Yes, this is a lot of work, but should be fairly simple if you follow closely, and its totally worth it if you love to see the emails land into the inbox of gmail :).
Restart OpenDKIM: At this point you can restart OpenDKIM so that it can reload configurations.
Setup Postfix Milter
Now we shall configure postfix to make it use opendkim through milters. You just have to add a couple of lines to the postfix main.cf configuration file.
Edit the /etc/postfix/main.cf file using nano text editor in the terminal, and add the following piece of configuration.
# OpenDKIM MILTER settings

milter_protocol = 2
milter_default_action = accept

smtpd_milters = inet:localhost:12301
non_smtpd_milters = inet:localhost:12301
The above lines will tell postfix to communicate with the opendkim daemon, which will in turn sign the messages using keys configured previously. Carefully note the hostname localhost and port number 12301 which is the port for opendkim as we checked with netstat earlier. This port number can be anything per your choice. Make sure to select something that does not conflict with other network services on the machine.
After setting up both opendkim and postfix restart the services:
service postfix restart
service opendkim restart
However there is one very important thing still left, which is to setup the dns records to declare the public key.
Setup the DNS records
As discussed earlier, when we create keys using the opendkim-genkey command, it makes 2 files, namely .private and .txt. The .txt file contains the public key.
Here is a sample mail.txt file located at: /etc/opendkim/keys/example.com/mail.txt
# cat /etc/opendkim/keys/example.com/mail.txt
mail._domainkey IN      TXT     ( "v=DKIM1; h=sha256; k=rsa; "
          "p=MIIBIjANBgkqhkiG9w0BAQEFAAOCAQ8AMIIBCgKCAQEA4EY+F/b9cVIA9QbDrtB3asCrdtnwF5ZDHJc3gdmVB9IUnq+4fyHRids3SMIB10OTPM7PEe1ScSuuklG2UZMIJHeENymxPUd/xcC/6mbtVE4zHDbbBM4Q7VJHczaK4+o3Hso7X6q/NVDlAwGIV/R5fc3nS7okPdnS6qTZup2u2p0xxHDiZfZqiPtxeZhdMvERiMphH84fFD/95t"
          "omGwMLDeD1yV79yF8XHrYQK+wMszkQsiL45O5SPTD2brNp/d2U1sXLpRfW/I8SVTpw3hbzqYrxg9CXfO5vWHdllpggjp0KtROlxlldVgdlqCtFz0FNUFuK4rLN6Jj3LlGp8KcuDwIDAQAB" )  ; ----- DKIM key mail for example.com
#
Copy the part starting from v=DKIM1... and remove the double-quotes and stick everything together. Remove the part after the last double-quotes as well.
It should look something like this after editing:
v=DKIM1; h=sha256; k=rsa; p=MIIBIjANBgkqhkiG9w0BAQEFAAOCAQ8AMIIBCgKCAQEA4EY+F/b9cVIA9QbDrtB3asCrdtnwF5ZDHJc3gdmVB9IUnq+4fyHRids3SMIB10OTPM7PEe1ScSuuklG2UZMIJHeENymxPUd/xcC/6mbtVE4zHDbbBM4Q7VJHczaK4+o3Hso7X6q/NVDlAwGIV/R5fc3nS7okPdnS6qTZup2u2p0xxHDiZfZqiPtxeZhdMvERiMphH84fFD/95tomGwMLDeD1yV79yF8XHrYQK+wMszkQsiL45O5SPTD2brNp/d2U1sXLpRfW/I8SVTpw3hbzqYrxg9CXfO5vWHdllpggjp0KtROlxlldVgdlqCtFz0FNUFuK4rLN6Jj3LlGp8KcuDwIDAQAB
The above piece of text will go into the dns records as a TXT record for the subdomain mail._domainkey
Check dkim dns records
After setting up the dns records for your domain, you need to check it to make sure its setup correctly. DNS settings take time to propagate, so do it after a couple of hours.
On linux, the dig command can be used to check dns records. Since we setup the dkim records as TXT records you need to query for TXT records with the correct name.
dig +short TXT mail._domainkey.example.com
The above command should immediately output the value of the record which should be the same as whatever you had setup in the previous step.
Send test mail
After setting up dkim with postfix, its time to send a real mail and see if the mail is being signed properly by opendkim. There are a number of ways to do this, but we shall send a simple email from the command line using the mail/mailx command.
To learn about the mail command and how to send emails from the command line in linux, check out our previous articles:
Linux mail command examples - send mails from command line
9 mail/mailx command examples to send emails from command line on Linux
Send to Gmail
One of the simplest ways to test dkim functioning, is by send an email to a gmail address that you can check. Simply send the mail and view the original source message inside of gmail and look at the headers for dkim verification details.
The following command will run the free command and email the output to a gmail address.
free | mailx -a 'From:RealName<[email protected]>' -r "[email protected]" -s "Free memory on server" [email protected]
Now open gmail, open the particular email and click "Show Original" and check the headers.
Subject:	Free memory on binarytides server
SPF:	PASS with IP xxx.xxx.xxx.xxx Learn more
DKIM:	'PASS' with domain binarytides.com Learn more
DMARC:	'PASS' Learn more
If the DKIM header value is 'PASS' it means that dkim is setup and working correctly.
Other online services
There are a couple of other online services that can be used to quickly test dkim along with other things like spf and dmarc. One such site is https://www.mail-tester.com/.
It shows the results of tests in web interface that is very easy to use. When dkim is setup correctly it would show "Your DKIM signature is valid".
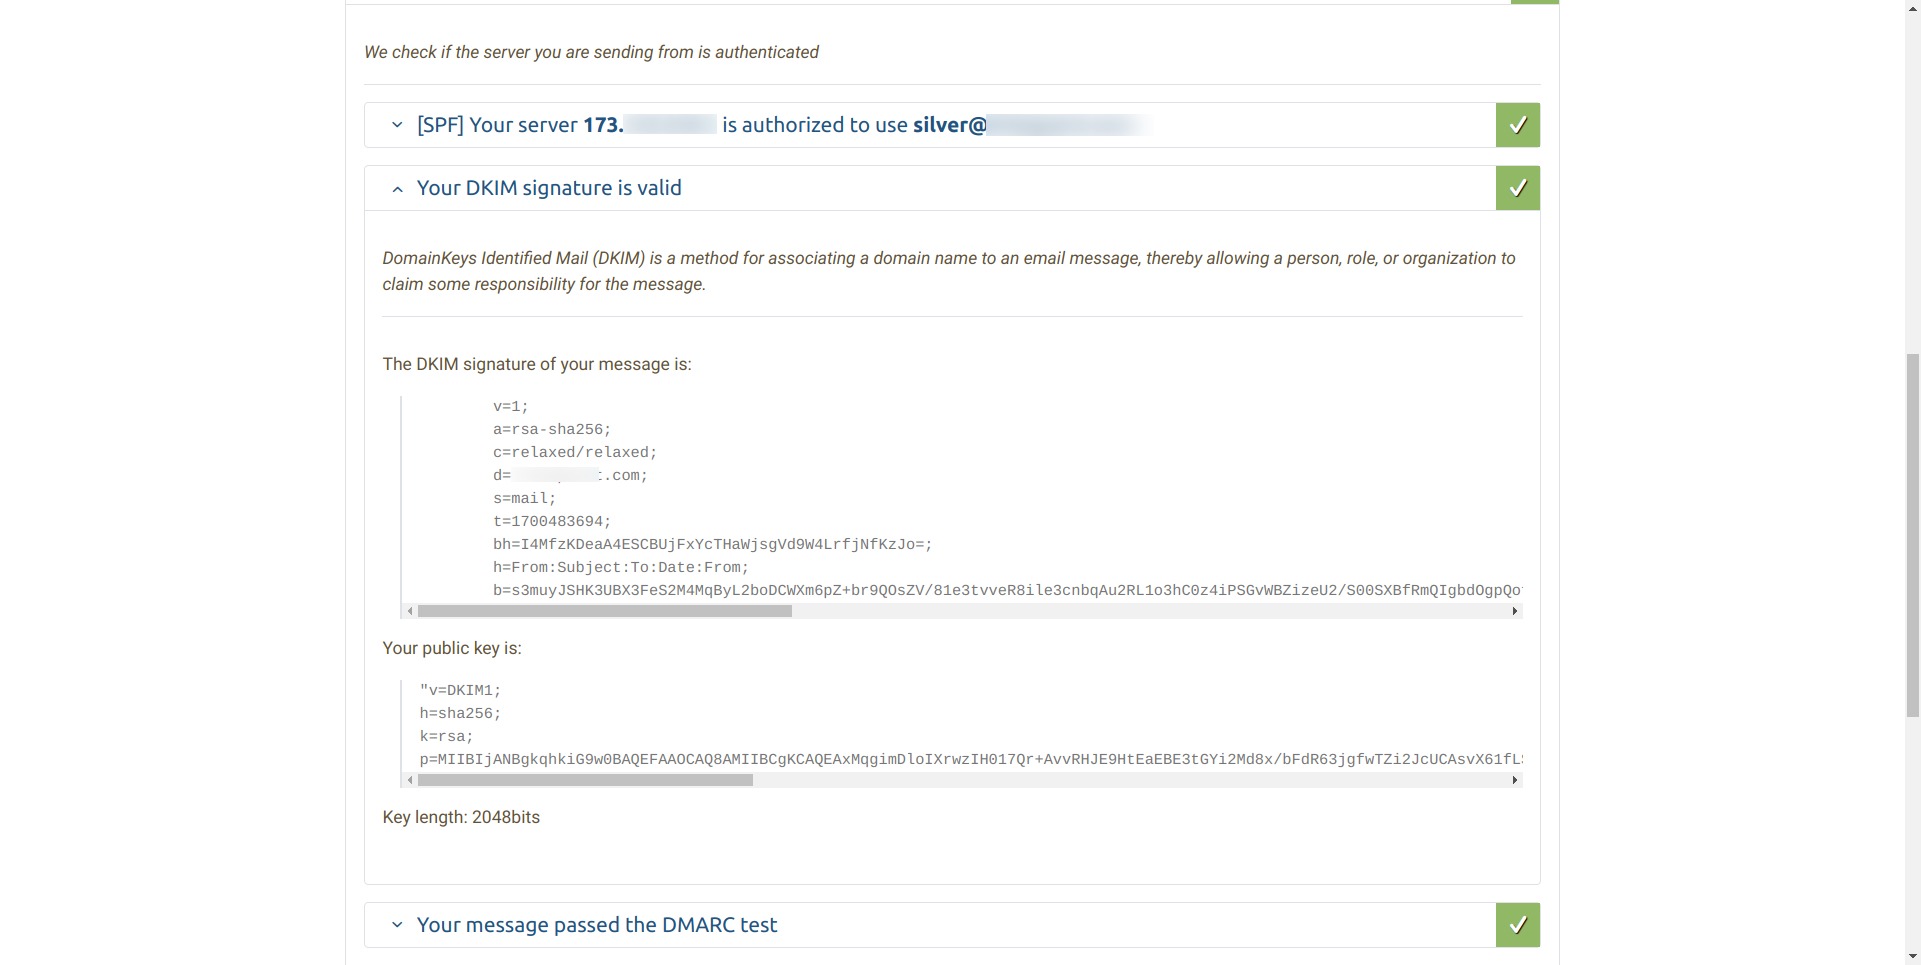
Mail Tester DKIM Test Results
Log files and Errors
Like every other good system administrator you are also likely to run in errors and problems along the process of setup. Its important to know the correct log files to catch the errors and fix them.
The following log files are important as we setup opendkim with postfix.
- /var/log/mail.err
- /var/log/mail.log
OpenDKIM writes to both log files according to the situation. Normal logs will go into mail.log and error messages will go into mail.err
tail -f /var/log/mail.err
Other commands to check logs
sudo journalctl -eu opendkim
OpenDKIM error messages
You could run into many different kind of opendkim error messages during the setup and testing process. Here are some examples of error messages.
This one (signing table references unknown key) comes up often if the KeyTable or its path is not specified correctly. OpenDKIM is not able to find the correct key for signing a particular email.
# 2023-10-15T14:05:07.840565+05:30 xxx-xxx-xxx-xxx opendkim[83963]: CD0A211FB8: signing table references unknown key 'mail._domainkey.example.com'
One possible cause of the error is using "refile" prefix for the KeyTable file path which you should not, unless it contains regex format data.
Mail delivery failure examples
If you do not have dkim setup and working properly, major free email providers might totally reject emails sent out from your server. For instance gmail seems to be the most strict when it comes to dealing with spam messages, and often times it will outright reject the email instead of putting it in the spam folder.
This can be a critical problem because it will lead to a complete breakdown of email communication. Hence in order to avoid such problems make sure you setup dkim signing properly with your server mta like postfix or exim.
Here is a typical error message from gmail when dkim verification fails. This message is received by postfix and logged into mail.log
...
2023-10-16T16:03:25.498159+05:30 173-255-230-5 postfix/smtp[121435]: 876CA11FFD: to=<[email protected]>, relay=gmail-smtp-in.l.google.com[142.251.16.27]:25, delay=0.94, delays=0.06/0.01/0.22/0.66, dsn=5.7.26, status=bounced (host gmail-smtp-in.l.google.com[142.251.16.27] said: 550-5.7.26 This mail has been blocked because the sender is unauthenticated. 550-5.7.26 Gmail requires all senders to authenticate with either SPF or DKIM. 550-5.7.26  550-5.7.26  Authentication results: 550-5.7.26  DKIM = did not pass 550-5.7.26  SPF [xxx.com] with ip: [xxx.xxx.xxx.x] = did not pass 550-5.7.26  550-5.7.26  To mitigate this issue, please visit Gmail's authentication guide 550-5.7.26 for instructions on setting up authentication: 550 5.7.26  https://support.google.com/mail/answer/81126#authentication 21-20020ac84e95000000b004055cf20b7fsi5241093qtp.760 - gsmtp (in reply to end of DATA command))
...
Sometimes, google will respond with an unsolicited mail error message when dkim verification fails. Here is an example of such a message.
...
2023-10-16T16:03:26.188308+05:30 173-255-230-5 postfix/smtp[121435]: 7A0F511FFE: to=<[email protected]>, orig_to=<[email protected]>, relay=gmail-smtp-in.l.google.com[142.251.16.27]:25, delay=0.69, delays=0/0/0.21/0.48, dsn=5.7.1, status=bounced (host gmail-smtp-in.l.google.com[142.251.16.27] said: 550-5.7.1 [xxx.xxx.xxx.xxx      12] Our system has detected that this message is 550-5.7.1 likely unsolicited mail. To reduce the amount of spam sent to Gmail, 550-5.7.1 this message has been blocked. Please visit 550-5.7.1  https://support.google.com/mail/?p=UnsolicitedMessageError for more 550 5.7.1 information. l3-20020ad44083000000b0066d02306e73si5085169qvp.169 - gsmtp (in reply to end of DATA command))
...
Having dkim signature in place will increase the chances of your email being accepted by gmail even if they go into the spam box. This assumes that other factors are good enough.
If you can manage to get your mail into gmail inbox, then you have setup things really nicely.
Conclusion
If you are using a cPanel managed hosting like Bluehost, Hostgator etc, then the cpanel/whm software automatically sets up dkim for you and you do not have to do a thing. I have used hostgator shared hosting and bluehost vps servers in the past and they implement dkim, spf, dmarc all in place quite correctly.
However, if you are running your own bare-bone linux server like a linode or digitalocean droplet, then you have to setup things manually by yourself to make sure that emails are delivered correctly.
DKIM by itself is nothing new and has been around for over a decade now. However its adoption as a mechanism to combat spam has increased many-folds. Free email providers like gmail make it mandatory to sign emails originating from your server. Things will only get stricter moving forward.
Besides dkim, you should also look into setting up spf and dmarc records correctly in your domain dns. They are also used to identify valid email sends and separate out the spam senders.
Links and Resources
https://www.ietf.org/rfc/rfc4871.txt - RFC Document for DKIM
https://wiki.debian.org/opendkim - Debian Wiki page on opendkim setup
https://wiki.archlinux.org/title/OpenDKIM - Archlinux wiki page on opendkim setup