Multipass is a tool used to generate cloud-style Ubuntu VMs quickly on Linux, macOS, and Windows. It's designed for developers who want a fresh Ubuntu environment with a single command. It uses KVM on Linux, Hyper-V on Windows, and HyperKit on macOS to run the VM with minimal overhead.
The tool gives you a simple but powerful CLI that allows you to access an Ubuntu command line quickly or create your own local mini-cloud.
It can also be used for Local development and testing, which is otherwise a pain. Multipass makes it easier by automating all of your setup and teardown. It has a growing library of images that give you the ability to launch purpose-built VMs or custom VMs you've configured yourself through its powerful cloud-init interface.
Developers can use Multipass to prototype cloud deployments and to create fresh, customized Linux dev environments on any machine. Mac and Windows users can use Multipass as the quickest way to get an Ubuntu command line on their system. New Ubuntu users can use it as a sandbox to try new things without affecting their host machine and without the need to dual boot.
Installation
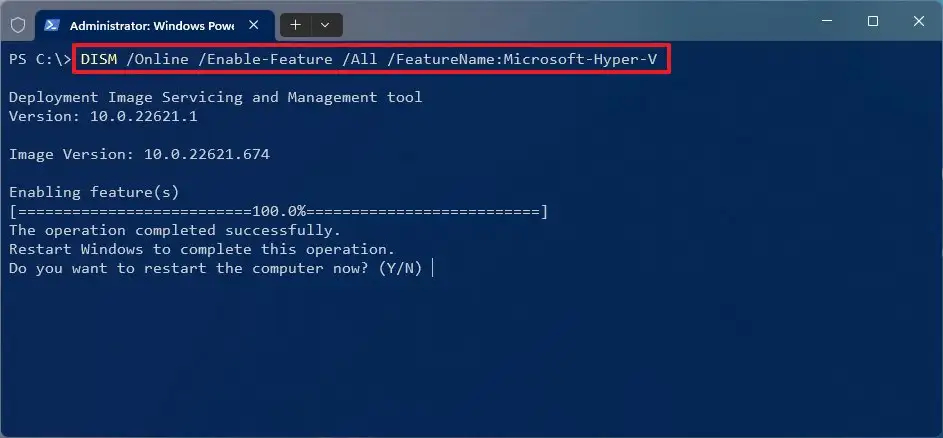
As mentioned, Multipass uses Hyper-V or VirtualBox on Windows as Virtualization providers. It employs Hyper-V by default to launch Virtual Machines. But in some devices, it is not enabled by default, which makes Hyper-V option grey out on installation.
To enable Hyper-V, turn on Virtualization on BIOS Settings and open Power Shell as Administrator. Then, run the following command:
DISM /Online /Enable-Feature /All /FeatureName:Microsoft-Hyper-V
You can download VirtualBox from the official providers. The useful links and resources are provided at the end.
Download the Multipass installer from the link given in Links and Resources. Run the installer and go with the on-screen instructions. You can select Hyper-V if it's supported on your PC or Install VirtualBox.
Creating an Ubuntu Instance
GUI Simple Method
Launch Multipass by searching for it in the search bar. You will see a pop-up notification for Multipass. In the Hidden Icons menu, you will find the Multipass icon. Right-click on it and select Open Shell.
This method launches an instance of the latest version of Ubuntu with the instance name of primary.
You can see the following output on the terminal:
Launched: primary
Skipping mount due to disabled mounts feature
Welcome to Ubuntu 22.04.2 LTS (GNU/Linux 5.15.0-73-generic x86_64)

 * Documentation:  https://help.ubuntu.com
 * Management:     https://landscape.canonical.com
 * Support:        https://ubuntu.com/advantage

  System information as of Tue Jun  6 01:20:08 UTC 2023

  System load:  1.111328125       Processes:               95
  Usage of /:   30.3% of 4.67GB   Users logged in:         0
  Memory usage: 20%               IPv4 address for enp0s3: 10.0.2.15
  Swap usage:   0%


Expanded Security Maintenance for Applications is not enabled.

0 updates can be applied immediately.

Enable ESM Apps to receive additional future security updates.
See https://ubuntu.com/esm or run: sudo pro status

To run a command as administrator (user "root"), use "sudo <command>".
See "man sudo_root" for details.

ubuntu@primary:~$
Let's test it out!
As we just learned, the previous step automatically mounted our $HOME directory in the instance. Let's try out a few more Linux commands to see what we're working with:
ubuntu@primary:~$ free
               total        used        free      shared  buff/cache   available
Mem:          976420      176480      445352         964      354588      661152
Swap:              0           0           0
ubuntu@primary:~$ df
.Filesystem     1K-blocks    Used Available Use% Mounted on
tmpfs              97644     960     96684   1% /run
/dev/sda1        4893836 1519828   3357624  32% /
tmpfs             488208       0    488208   0% /dev/shm
tmpfs               5120       0      5120   0% /run/lock
/dev/sda15        106858    6182    100677   6% /boot/efi
tmpfs              97640       4     97636   1% /run/user/1000
Congratulations, you've got your first instance!
This instance is great for when we just need a quick Ubuntu VM, but let's say we want a more customized instance. Multipass has us covered there too!
Manual Command Line Method
Open the Windows Terminal and run the following command:
PS C:\Users> multipass find
Image                       Aliases           Version          Description
core                        core16            20200818         Ubuntu Core 16
core18                                        20211124         Ubuntu Core 18
core20                                        20230119         Ubuntu Core 20
core22                                        20230119         Ubuntu Core 22
snapcraft:core18            18.04             20201111         Snapcraft builder for Core 18
snapcraft:core20            20.04             20210921         Snapcraft builder for Core 20
snapcraft:core22            22.04             20220426         Snapcraft builder for Core 22
20.04                       focal             20230530         Ubuntu 20.04 LTS
22.04                       jammy,lts         20230602         Ubuntu 22.04 LTS
22.10                       kinetic           20230530         Ubuntu 22.10
appliance:adguard-home                        20200812         Ubuntu AdGuard Home Appliance
appliance:mosquitto                           20200812         Ubuntu Mosquitto Appliance
appliance:nextcloud                           20200812         Ubuntu Nextcloud Appliance
appliance:openhab                             20200812         Ubuntu openHAB Home Appliance
appliance:plexmediaserver                     20200812         Ubuntu Plex Media Server Appliance
anbox-cloud-appliance                         latest           Anbox Cloud Appliance
charm-dev                                     latest           A development and testing environment for charmers
docker                                        0.4              A Docker environment with Portainer and related tools
jellyfin                                      latest           Jellyfin is a Free Software Media System that puts you in control of managing and streaming your media.
minikube                                      latest           minikube is local Kubernetes
ros-noetic                                    0.1              A development and testing environment for ROS Noetic.
ros2-humble                                   0.1              A development and testing environment for ROS 2 Humble.
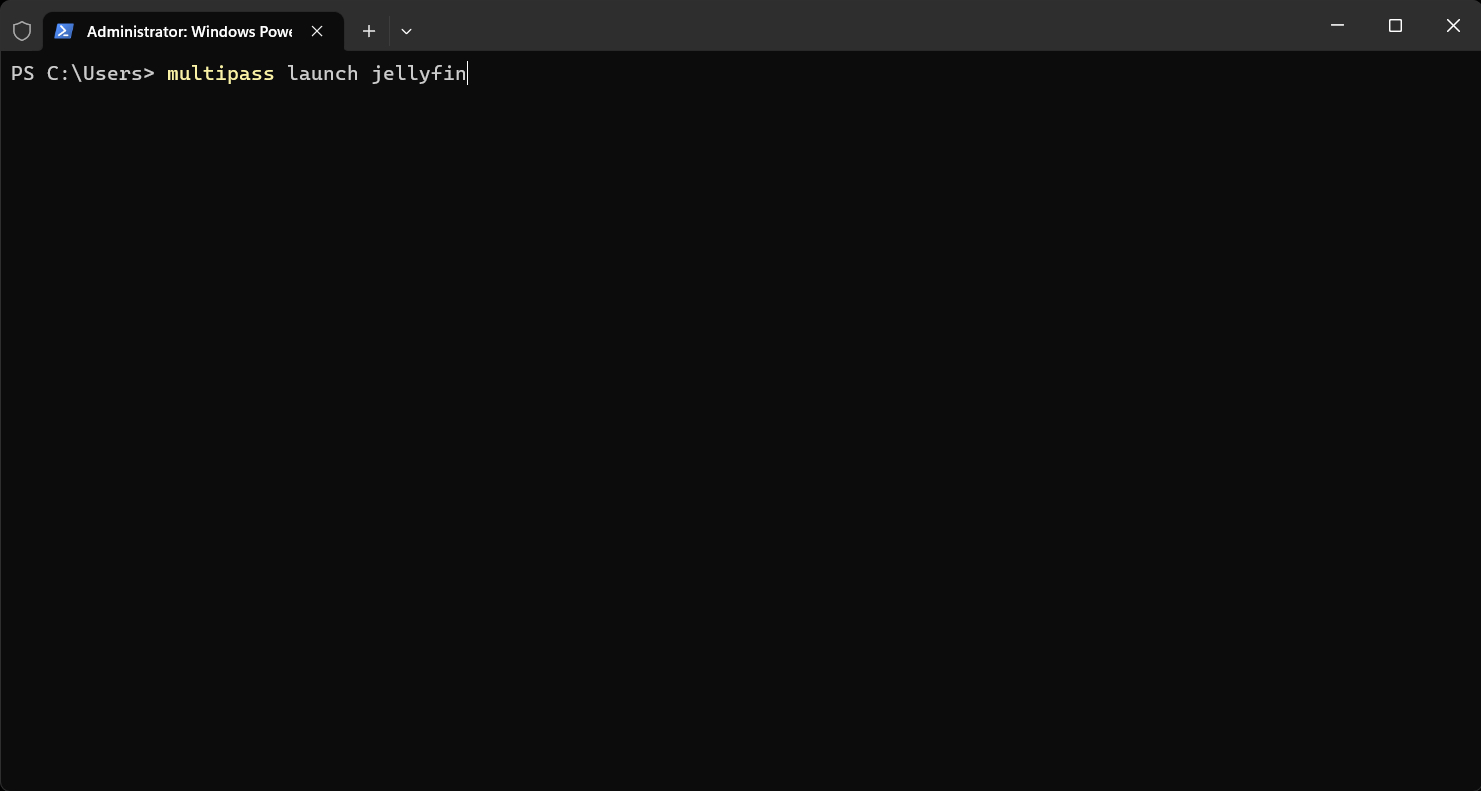
Let's launch an instance running Ubuntu 22.10 ("Jellyfin") by typing the following command:
PS C:\Users> multipass launch jellyfin
Launched: jellyfin
You can check some basic information about your new instance with the below command:
PS C:\Users> multipass exec jellyfin -- lsb_release -a
This tells Multipass to execute the command lsb_release -a on the "jellyfin" instance.
No LSB modules are available.
Distributor ID: Ubuntu
Description:    Ubuntu 22.04.2 LTS
Release:        22.04
Codename:       jammy
Get a list of instances you have created by running the below command:
Multipass list
Name                    State             IPv4             Image
primary                 Running           N/A              Ubuntu 22.04 LTS
expectant-pigeon        Running           N/A              Ubuntu 22.10
jellyfin                Running           N/A              Ubuntu 22.04 LTS
primed-koel             Running           N/A              Ubuntu 22.04 LTS
You can also stop and delete the running instances using the following commands:
Multipass stop primary
Multipass delete primary
PS C:\Users> multipass list
Name                    State             IPv4             Image
primary                 Deleted           --               Not Available
expectant-pigeon        Deleted           --               Not Available
jellyfin                Running           N/A              Ubuntu 22.04 LTS
primed-koel             Deleted           --               Not Available
Creating a Custom Instance
Custom Instances can be created with the precondition of specific disk space, memory, and CPU. Basically, there is an allocation of a specific amount of resources to the instance you are creating. With Multipass, you can allocate resources in the command line at the time of instance creation by running the below command.
PS C:\Users> multipass launch lts --name ltsInstance --memory 2G --disk 10G --cpus 2
Launched: ltsInstance
Now let's confirm if this new instance has the specs you're looking for with the following command:
PS C:\Users> multipass info ltsInstance
Name:           ltsInstance
State:          Running
IPv4:           N/A
Release:        Ubuntu 22.04.2 LTS
Image hash:     7d830df583e8 (Ubuntu 22.04 LTS)
CPU(s):         2
Load:           0.08 0.05 0.06
Disk usage:     1.4GiB out of 9.5GiB
Memory usage:   174.9MiB out of 1.9GiB
Mounts:         --
We can also run commands, upgrade the distro, and install packages like Apache web server, net-tools, PHP, etc., on created instances from the terminal, without opening the instance shell.
To do so, open the Terminal and type the following command:
PS C:\Users> multipass exec jellyfin sudo apt update
Hit:1 http://archive.ubuntu.com/ubuntu jammy InRelease
Hit:2 http://archive.ubuntu.com/ubuntu jammy-updates InRelease
Hit:3 http://security.ubuntu.com/ubuntu jammy-security InRelease
Hit:4 http://archive.ubuntu.com/ubuntu jammy-backports InRelease
Hit:5 https://repo.jellyfin.org/ubuntu jammy InRelease
Reading package lists... Done
Building dependency tree... Done
Reading state information... Done
4 packages can be upgraded. Run 'apt list --upgradable' to see them.
This way we can run commands on created instances from the terminal without accessing the shell by launching it.
Installing Apache
Let's install Apache on VM from the terminal. Type the following command:
Multipass exec jellyfin sudo apt install apache2
It will install Apache on the VM instance. Let us check the web server status.
PS C:\Users> multipass exec jellyfin sudo systemctl status apache2
● apache2.service - The Apache HTTP Server
     Loaded: loaded (/lib/systemd/system/apache2.service; enabled; vendor preset: enabled)
     Active: active (running) since Fri 2023-06-09 18:07:43 IST; 31s ago
       Docs: https://httpd.apache.org/docs/2.4/
   Main PID: 3612 (apache2)
      Tasks: 55 (limit: 4642)
     Memory: 5.0M
        CPU: 31ms
     CGroup: /system.slice/apache2.service
             ├─3612 /usr/sbin/apache2 -k start
             ├─3613 /usr/sbin/apache2 -k start
             └─3614 /usr/sbin/apache2 -k start

Jun 09 18:07:43 jellyfin systemd[1]: Starting The Apache HTTP Server...
Jun 09 18:07:43 jellyfin apachectl[3611]: AH00558: apache2: Could not reliably determine the server's fully qualified d>
Jun 09 18:07:43 jellyfin systemd[1]: Started The Apache HTTP Server.
As confirmed by this output, the service has started successfully.
Installing PHP
To install PHP, run the following command on the terminal:
Multipass exec jellyfin sudo apt install php
This allows you to install packages through the terminal, with the Multipass exec command on instances that are running.
Transferring files between an instance and the Host (Windows)
We can also transfer files between the host and the instance using the Multipass transfer command.
For example, to copy a local file (local_file.txt) to the default home folder of the instance jellyfin, run:
multipass transfer local_file.txt jellyfin:
In the same way, to copy a file (instance_file.txt) from the default home folder of the ample-pigeon instance to the current working folder, run:
multipass transfer ample-pigeon:remote_file.txt
Executing Commands Inside the Multipass VM Shell
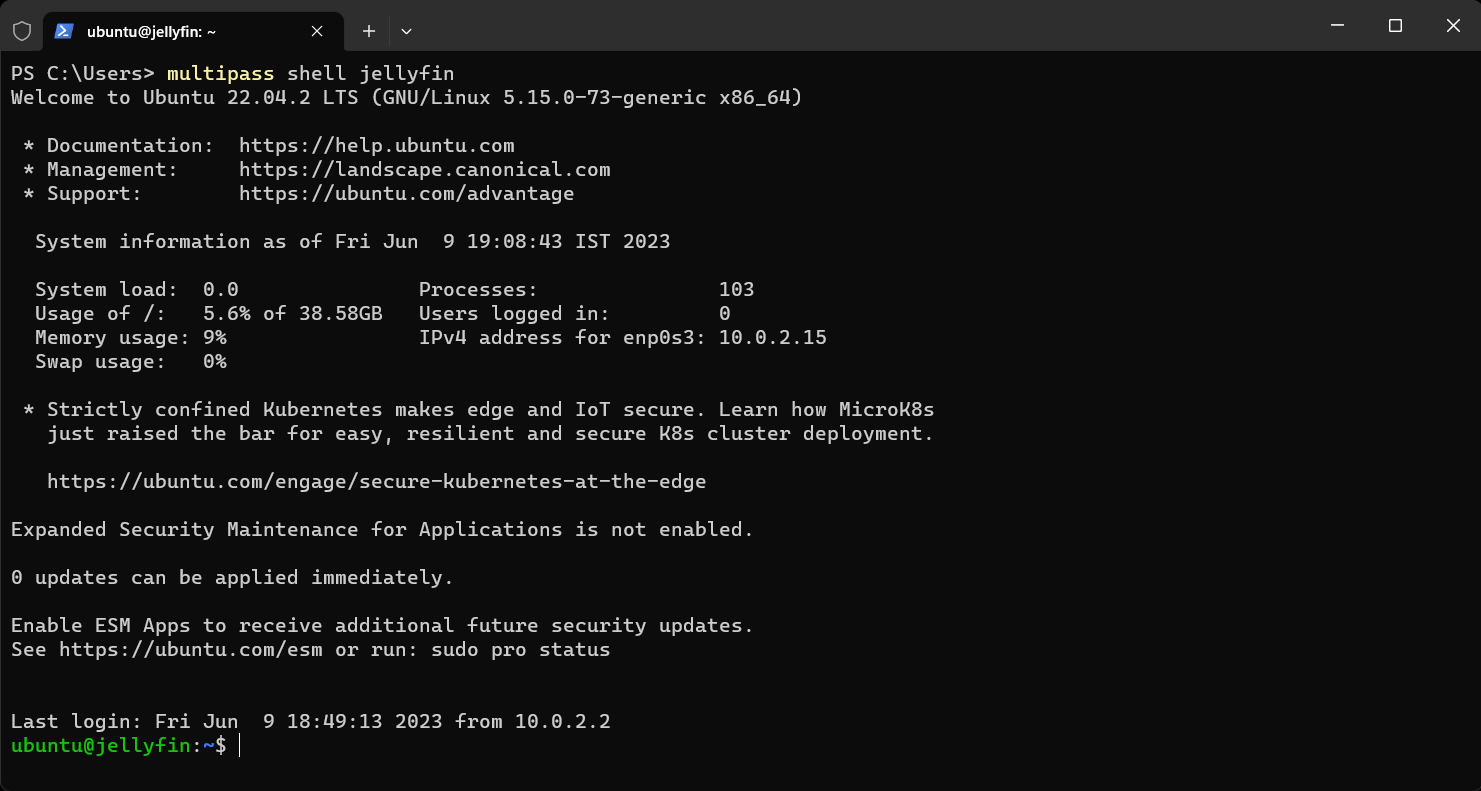
Launch the Multipass shell that is running by executing the following command in the Terminal.
Multipass shell jellyfin
This command launches the jellyfin instance shell inside the terminal.
Let us now install neofetch package in the instance, and get system information from it.
sudo apt install neofetch
Neofetch

Installing net-tools
Sudo apt install net-tools
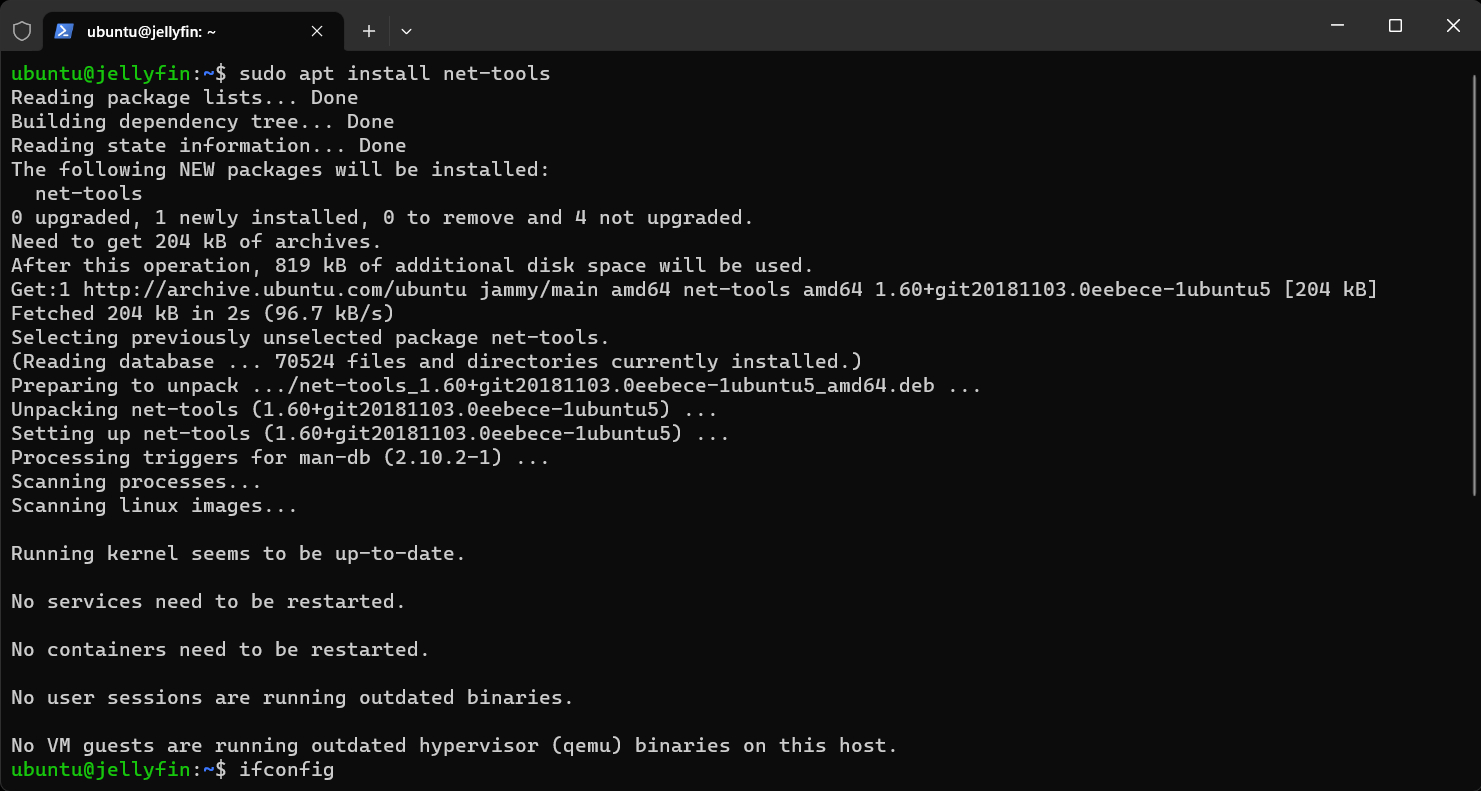
Checking Network Configuration
Let us check the Network Configuration of the instance using ifconfig.
Ifconfig

Configuring a new storage location
Open an administrator privileged PowerShell prompt and execute the following commands, replacing
PS> Stop-Service Multipass
PS> Set-ItemProperty -Path "HKLM:System\CurrentControlSet\Control\Session Manager\Environment" -Name MULTIPASS_STORAGE -Value "<path>"
PS> Start-Service Multipass
Links and Resources:
- Multipass Download Link: https://multipass.run/download/windows
- VirtualBox Download Link: https://www.oracle.com/technetwork/server-storage/virtualbox/downloads/index.html