Have you ever tried using Linux in Windows? If you do, then you need to use virtualization. Alternatively, you can do a dual-boot, which lets you use only one operating system at a time.
Meet Windows Subsystem for Linux. This new Windows feature lets you access Linux directly from Windows.
In this article, we'll go through a complete WSL2 guide. Let's get started.
What is WSL2?
WSL2 is the latest Windows Subsystem for Linux. It gives you the means to access GNU/Linux environments within Windows. Under the hood, it utilizes virtualization, but you wouldn't have to deal with it.
Technically, it gives users access to the Linux kernel. With it, you can run any Linux command. You can also run other command-line tools, utilities, and Linux apps.
Windows first launched WSL1. It was a good start but lacked execution speed. WSL2 fixed it while offering 20x faster execution.
Getting Started with WSL2
To get started, you need to install WSL2.
If you're already using the latest Windows, it probably comes pre-installed with it (or WSL1).
Before you get started, make sure that you run the command prompt with administrative privileges.
Check if WSL is installed
Type the following command to check.
$ wsl
It'll return the usage with arguments that you can use.
Copyright (c) Microsoft Corporation. All rights reserved.

Usage: wsl.exe [Argument]

Arguments:
…..
Installing WSL and default Ubuntu distro
To start the WSL installation process, type wsl --install command in the command prompt.
$ wsl --install
It'll start the installation process and ask for permissions along the way. By default, it'll also install the Ubuntu Linux distro.
Installing: Virtual Machine Platform
Virtual Machine Platform has been installed.
Installing: Windows Subsystem for Linux
Windows Subsystem for Linux has been installed.
Installing: Ubuntu
Ubuntu has been installed.
The requested operation is successful. Changes will not be effective until the system is rebooted.
Note: You can also get "Catastrophic failure" error. This mostly happens if you fail to run the command with administrative privilege. So, re-run the command with administrative privilege to bypass the error.
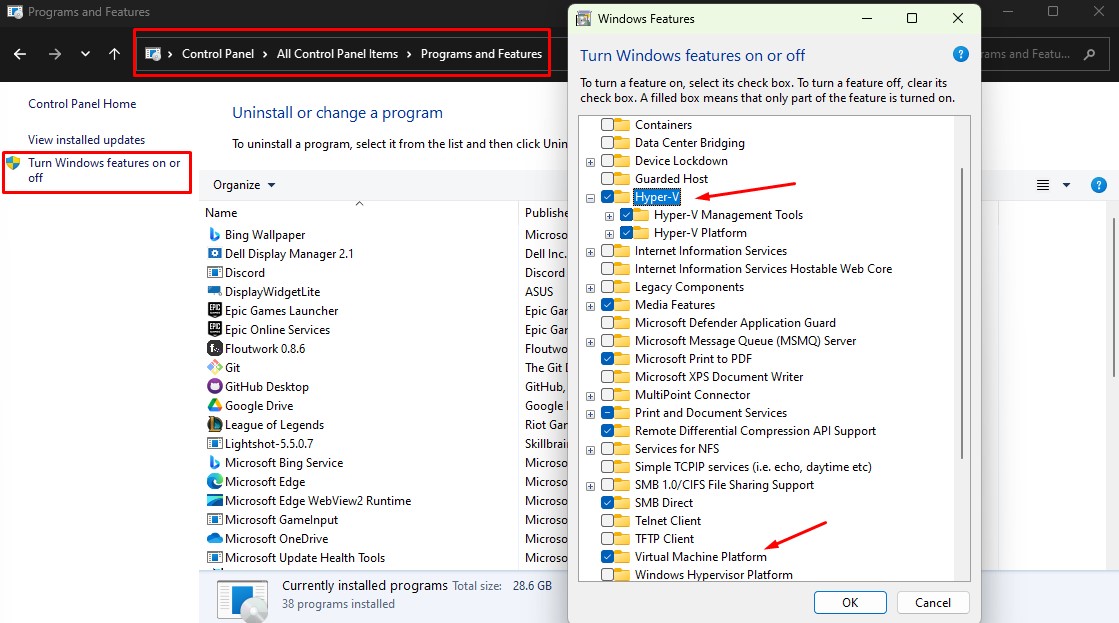
If, for some reason, the installation doesn't go through, then you need to make sure that WSL is enabled on your system.
You need to go to Control Panel & Programs and Features and then "Turn Windows Features on or off" to enable it. Look for two options, "Hyper-V", and "Virtual Machine Platform." Enable them and then try to run the wsl --install command again.
Now, restart your machine for it to install completely.
Once restarted, it'll continue Ubuntu installation. Here, it'll ask for a new UNIX username and password.
Ubuntu is already installed.
Launching Ubuntu...
Installing, this may take a few minutes...
Please create a default UNIX user account. The username does not need to match your Windows username.
For more information visit: https://aka.ms/wslusers
Enter new UNIX username:
New password:
Retype new password:
Type your preferred username and password. Once done, it'll complete the installation.
Note: In some cases, your installation will go just fine. However, post reboot, you'll get an error, "WslRegisterDistribution failed with error: 0x80370102". It means that Virtual Machine Platform Windows feature is not enabled. You also need to enable virtualization in the BIOS. In other cases, you may want to change WSL version to 1. To do so type wsl --set-default version 1 and then type wsl --install again. This is because WSL 1 doesn't need virtualization to run.
If you're still stuck, check out how to fix Error 0x80370102.
Upgrading WSL1 to 2
By default, the WSL version is 1. To upgrade it to 2, do the following.
wsl --set-default-version 2
For information on key differences with WSL 2 please visit https://aka.ms/wsl2
The operation was completed successfully.
Checking the Installed Distro version
To check its version, type the following command.
lsb_release -a
No LSB modules are available.
Distributor ID: Ubuntu
Description:    Ubuntu 22.04.1 LTS
Release:        22.04
Codename:       jammy
That's it. You have successfully installed the Ubuntu distro with WSL.
Installing other distros
To install other distros, you must first learn which ones are available. To do so, type the wsl --list --online command.
$ wsl --list --online
The following is a list of valid distributions that can be installed.
Install using 'wsl.exe --install'.

NAME                                   FRIENDLY NAME
Ubuntu                                 Ubuntu
Debian                                 Debian GNU/Linux
kali-linux                             Kali Linux Rolling
Ubuntu-18.04                           Ubuntu 18.04 LTS
Ubuntu-20.04                           Ubuntu 20.04 LTS
Ubuntu-22.04                           Ubuntu 22.04 LTS
OracleLinux_8_5                        Oracle Linux 8.5
OracleLinux_7_9                        Oracle Linux 7.9
SUSE-Linux-Enterprise-Server-15-SP4    SUSE Linux Enterprise Server 15 SP4
openSUSE-Leap-15.4                     openSUSE Leap 15.4
openSUSE-Tumbleweed                    openSUSE Tumbleweed
As you can see, currently, it provides a good collection of Linux distros. They are officially supported. If you want to install an unofficial Linux distro through WSL, go to the Windows store and search for that particular distro. For example, Fedora is not supported yet. However, community members have released their own Fedora distro on Windows Store, which you can download and install.
Note: It is advisable to install an unofficially supported Linux distro only if it can justify its need. They might not be completely secure and can cause data theft or other security issues.
To install a particular distro, you need to use the wsl --install command.
Let's use it to install OpenSUSE Leap 15.4
$ wsl --install OpenSUSE-Leap-15.4
In this case, you'll find it opens up a GUI-based installation process.

It'll ask you to agree to user terms and then provide full name, username, and password.
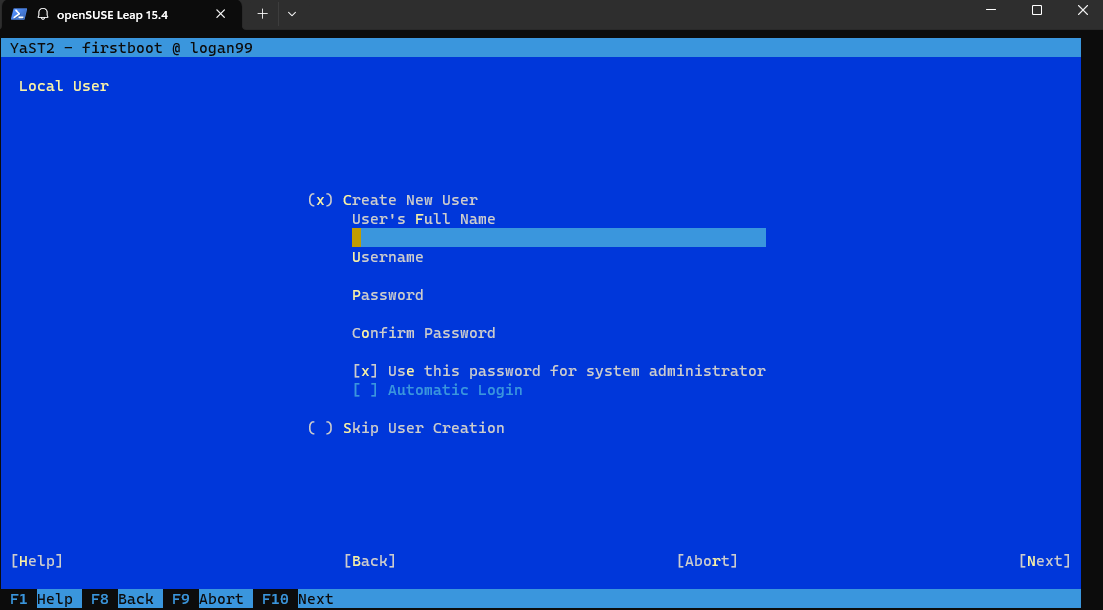
Finally, it'll show you a success screen.

Note that you can move through the options by pressing the TAB button on your keyboard.
To check if the installation is successful, type cat /etc/os-release to know the openSUSE Leap version.
$ cat /etc/os-release
NAME="openSUSE Leap"
VERSION="15.4"
ID="opensuse-leap"
ID_LIKE="suse opensuse"
VERSION_ID="15.4"
PRETTY_NAME="openSUSE Leap 15.4"
ANSI_COLOR="0;32"
CPE_NAME="cpe:/o:opensuse:leap:15.4"
BUG_REPORT_URL="https://bugs.opensuse.org"
HOME_URL="https://www.opensuse.org/"
DOCUMENTATION_URL="https://en.opensuse.org/Portal:Leap"
LOGO="distributor-logo-Leap"
Changing Default Linux Distro
By default, WSL chooses Ubuntu as the default Linux distro. You can check it by running the wsl --list command.
$ wsl --list
It'll return the installed Linux distro on your system. Moreover, it'll show you the default distro with the default keyword.
Windows Subsystem for Linux Distributions:
Ubuntu (Default)
openSUSE-Leap-15.4
To change the default distro, use the wsl --setdefault command.
For example, if we want to change the default distro to openSUSE Leap 15.4, we must run the following command.
$ wsl --setdefault openSUSE-Leap-15.4
Now, to check if the command is successful, type wsl --list command again, and it should show you openSUSE Leap 15.4 as the default distro.
So, the next time you type wsl command, it'll launch openSUSE Leap 15.4 instead of Ubuntu.
Update Linux
You must update Linux after installing it with WSL. To do so, run the apt update and apt upgrade commands. This needs to be done once you're within a Linux distro.
For example, run the wsl command to launch the default distro, and then run the following commands.
$ sudo apt update
$ sudo apt upgrade
Launch a particular distro using a different username
To launch a distro with a different username, type wsl -d --user .
So, if you want to launch openSUSE Leap with the root username, you can do it with the following command.
$ wsl -d openSUSE-Leap-15.4 --user root
[term]

Note: If no username exists, you'll get an error, "User not found."

<h3>Change the WSL version for a particular distro</h3>

If you have a particular requirement and want to use WSL 1 instead of WSL2 (or vice versa), you can easily change their version by running the <strong>wsl --list --verbose</strong> command.

[term]
$ wsl --list --verbose
It'll list the available distro along with their WSL version.
NAME                  STATE           VERSION
* openSUSE-Leap-15.4    Stopped         2
  Ubuntu                Stopped         2
To change the version, type the wsl --set-version .
So, if you want to change OpenSUSE-Leap-15.4 to use WSL1, type the following command.
$ wsl --set-version OpenSUSE-Leap-15.4 1
Pros and Cons of WSL vs Virtualbox/VMWare
WSL is only one of the answers to Linux virtualization. Of course, you can always use Virtualbox/VMWare to virtualize Linux. However, both approaches have their pros and cons.
It's best to stick to virtualization software, such as Virtualbox/VMWare, in the following cases:
- If you are new to Linux and want to learn it
- If you want to use the GUI application in Linux. WSL doesn't wholly support GUI apps
- If you're going to try out different distros, how they feel and behave. WSL doesn't support all distros
However, WSL also offers benefits in some scenarios. These include:
- If you want to access Linux directly from a Windows terminal without installing third-party software such as Virtualbox/VMWare
- If you want to access only the command-line interface of Linux
- If you want to avoid performance penalties with virtualization software
- If you're already familiar with Linux and want kernel access for development purposes
- If you want your Windows to have better integration with Linux
In conclusion, use WSL if you're already familiar with Linux and want to use it for development. It is also best to install Linux in virtualization software such as VirtualBox/VMWare to experience Linux fully.
WSL1 vs WSL2
Microsoft released Windows Subsystem for Linux. Its initial version (1) offers decent features and gets the job done. To improve WSL, Microsoft launched WSL2, an upgraded and fast WSL version. Under the hood, it utilizes Hyper-V technology, making it 20x faster than WSL1.
Other WSL2 benefits include:
- Seamless Windows and Linux integration
- GUI application support
- Faster boot times
- Small resource footprint
- Requires no VM configuration or management
In short, WSL2 is a significant overhaul and brings multiple benefits over WSL1.
However, if you want to stick to WSL1, you can, as Microsoft has no plans to deprecate WSL1.
To read more about WSL1 and WSL2, check out Comparing WSL Versions.
Installing Standard Apps in Ubuntu Environment
Awesome, you have installed WSL! However, before you can use Linux at its full potential, you must update it using the following command.
$ sudo apt-get update
$ sudo apt-get upgrade
Next, you can use the terminal to install standard Ubuntu apps, such as archive manager, visual studio code, python, and so on. To do so, use the following commands.
$ sudo apt-get install python3.6
$ sudo apt install code -y
Installing GUI Apps
You need to install the respective drivers to install GUI apps on WSL-powered Linux. You can check Intel, AMD, and NVIDIA specialized drivers for WSL. Also, before you install GUI apps, update WSL with the wsl --update command.
Now, let's install Gedit, the default text editor for the GNOME desktop environment.
$ sudo apt install gedit-y
To install GIMP, run the following command.
$ sudo apt install gimp -y
To install VLC, run the following:
$ sudo apt install vlc -y
Transferring files between the host Windows 11 system and WSL environment
To copy and move files from the WSL instance to the Windows drive, you can use the /mt/c/path/to/file from WSL.
$ cd $HOME
mv /mnt/c/Users/youuser/Documents/project/myproject .
If you want to access the WSL instance's drive from Windows, you need to navigate to the following drive and drop or copy files from there.
\\wsl$\Ubuntu-20.04\home\your_username
However, you won't be able to access root-owned files or directories with \\wsl$\ share.
To do so, you must run chown to your user under root /.
$ sudo mkdir /project
$ sudo chown $USER:$USER /project
Conclusion
This leads us to the end of the WSL2 guide. Undoubtedly, WSL2 is very handy, especially for developers who want to access the Linux kernel while using Windows. So, what do you think about WSL2? Comment below and let us know.