Some time ago I had purchased a Seagate One Touch 5TB hard disk, and used it mostly for redundant backups and virtual machines. Suddenly a week ago I noticed that it has stopped working and plugging it into the usb port brought up nothing in the file manager.
I tried plugging it into different usb ports and on different windows and linux machines, but none of the machines could access the drive to read/write data. Clearly there was something wrong with the hard drive.
When plugged into a usb port, Ubuntu could detect and identify it, but could not access any partitions or data on it. The disk simply did not show in file managers like Dolphin.
Diagnosis
There are a couple of ways to diagnose a failing or unresponsive disk drive. These are done using different commands like fsck/e2fsck and dmesg. Below are some examples. The commands and process should work for hard drive of any brand and connected via any method to the system be it internal sata cables, m.2 nvme slots or external usb ports.
Some of the commands discussed below will not work with usb flash drives, as they have a slightly different hardware structure compared to real disk drives.
1. fsck
First let us run the fsck command and see what it detects and reports.
$ sudo fsck /dev/sdf
fsck from util-linux 2.38.1
e2fsck 1.47.0 (5-Feb-2023)
fsck.ext2: Invalid argument while trying to open /dev/sdf

The superblock could not be read or does not describe a valid ext2/ext3/ext4
filesystem.  If the device is valid and it really contains an ext2/ext3/ext4
filesystem (and not swap or ufs or something else), then the superblock
is corrupt, and you might try running e2fsck with an alternate superblock:
    e2fsck -b 8193 <device>
 or
    e2fsck -b 32768 <device>

$
Fsck failed to read the drive at all.
2. Manually reading partition table
At this point, i tried to manually read the mbr/gpt headers of the drive to see if they are accessible at all. This can be done using the hd or dd commands as shown below.
The output of the hd command is simply blank.
$ sudo hd -n 512 /dev/sdf
$
On a healthy disk, the output of hd command could look something like this. The following is the output for a 32GB sandisk usb 3.0 flash drive.
$ sudo hd -n 512 /dev/sde
00000000  00 00 00 00 00 00 00 00  00 00 00 00 00 00 00 00  |................|
*
000001c0  02 00 ee ff ff ff 01 00  00 00 ff df 94 03 00 00  |................|
000001d0  00 00 00 00 00 00 00 00  00 00 00 00 00 00 00 00  |................|
*
000001f0  00 00 00 00 00 00 00 00  00 00 00 00 00 00 55 aa  |..............U.|
00000200
$
dd command: The output of dd command shows nothing either. Indicating that the drive partition table area is probably inaccessible.
$ sudo dd if=/dev/sdf bs=512 count=1 | hexdump -C
0+0 records in
0+0 records out
0 bytes copied, 5.9363e-05 s, 0.0 kB/s
$
In a previous attempt the commands showed this, when the device was registered as sde.
$ sudo hd -n 512 /dev/sde
hd: /dev/sde: No such device or address
hd: all input file arguments failed
$

$ sudo dd if=/dev/sde bs=512 count=1 | hexdump -C
dd: failed to open '/dev/sde': No such device or address
$
Despite the /dev/sde device being present, it is not readable
3. Diagnosing with dmesg
Finally it was time to check the kernel logs and see what was happening with the drive. The dmesg command can be used to extract useful diagnostic information related to hardware devices.
The steps shown below are quite simple:
1. Unplug the hard disk - The first step is to disconnect the drive completely from the system
2. Launch dmesg command - Now open a terminal and run the dmesg with the following options. It will allow us to monitor the dmesg output in real-time.
sudo dmesg -Tw
Hit "Enter" a couple of times to create a readable gap.
3. Plug the hard drive: Now plug the usb drive and see what messages appear right away about the usb drive.
In my case it printed multiple blocks of text at intervals of several minutes. In the output below the triple dot indicates some time interval before the messages appeared after the previous one.
Upon connecting the hard drive to the usb port, the following block of text showed up immediately. The kernel is trying to connect and register the device as "sdf", but probably is going to take a lot of time and eventually fail.
[Tue Jul 25 15:51:19 2023] usb 2-1.2: new SuperSpeed USB device number 14 using xhci_hcd
[Tue Jul 25 15:51:19 2023] usb 2-1.2: New USB device found, idVendor=0bc2, idProduct=ab6e, bcdDevice=17.07
[Tue Jul 25 15:51:19 2023] usb 2-1.2: New USB device strings: Mfr=1, Product=2, SerialNumber=3
[Tue Jul 25 15:51:19 2023] usb 2-1.2: Product: One Touch w/PW
[Tue Jul 25 15:51:19 2023] usb 2-1.2: Manufacturer: Seagate
[Tue Jul 25 15:51:19 2023] usb 2-1.2: SerialNumber: 00000000NABX1ME0
[Tue Jul 25 15:51:19 2023] scsi host6: uas
[Tue Jul 25 15:51:19 2023] scsi 6:0:0:0: Direct-Access     Seagate  One Touch w/PW   1707 PQ: 0 ANSI: 6
[Tue Jul 25 15:51:19 2023] sd 6:0:0:0: Attached scsi generic sg5 type 0
...
...
[Tue Jul 25 15:55:28 2023] sd 6:0:0:0: [sdf] Spinning up disk...
...
A few minutes later these messages showed up
[Tue Jul 25 15:58:41 2023] sd 6:0:0:0: [sdf] tag#1 uas_eh_abort_handler 0 uas-tag 1 inflight: CMD IN
[Tue Jul 25 15:58:41 2023] sd 6:0:0:0: [sdf] tag#1 CDB: Read capacity(16) 9e 10 00 00 00 00 00 00 00 00 00 00 00 20 00 00
[Tue Jul 25 15:58:41 2023] scsi host6: uas_eh_device_reset_handler start
[Tue Jul 25 15:58:41 2023] usb 2-3: reset SuperSpeed USB device number 15 using xhci_hcd
[Tue Jul 25 15:58:41 2023] scsi host6: uas_eh_device_reset_handler success

...

[Tue Jul 25 15:58:51 2023] sd 6:0:0:0: [sdf] tag#1 uas_eh_abort_handler 0 uas-tag 1 inflight: CMD
[Tue Jul 25 15:58:51 2023] sd 6:0:0:0: [sdf] tag#1 CDB: Test Unit Ready 00 00 00 00 00 00
[Tue Jul 25 15:58:51 2023] scsi host6: uas_eh_device_reset_handler start
[Tue Jul 25 15:58:52 2023] usb 2-3: reset SuperSpeed USB device number 15 using xhci_hcd
[Tue Jul 25 15:58:52 2023] scsi host6: uas_eh_device_reset_handler success
[Tue Jul 25 15:58:52 2023] sd 6:0:0:0: Device offlined - not ready after error recovery
[Tue Jul 25 15:58:52 2023] sd 6:0:0:0: rejecting I/O to offline device
[Tue Jul 25 15:58:52 2023] sd 6:0:0:0: [sdf] Read Capacity(16) failed: Result: hostbyte=DID_NO_CONNECT driverbyte=DRIVER_OK
[Tue Jul 25 15:58:52 2023] sd 6:0:0:0: [sdf] Sense not available.
[Tue Jul 25 15:58:52 2023] sd 6:0:0:0: [sdf] Read Capacity(10) failed: Result: hostbyte=DID_NO_CONNECT driverbyte=DRIVER_OK
[Tue Jul 25 15:58:52 2023] sd 6:0:0:0: [sdf] Sense not available.
[Tue Jul 25 15:58:52 2023] sd 6:0:0:0: [sdf] 0 512-byte logical blocks: (0 B/0 B)
[Tue Jul 25 15:58:52 2023] sd 6:0:0:0: [sdf] 0-byte physical blocks
[Tue Jul 25 15:58:52 2023] sd 6:0:0:0: [sdf] Test WP failed, assume Write Enabled
[Tue Jul 25 15:58:52 2023] sd 6:0:0:0: [sdf] Asking for cache data failed
[Tue Jul 25 15:58:52 2023] sd 6:0:0:0: [sdf] Assuming drive cache: write through
[Tue Jul 25 15:58:52 2023] sd 6:0:0:0: [sdf] Preferred minimum I/O size 4096 bytes not a multiple of physical block size (0 bytes)
[Tue Jul 25 15:58:52 2023] sd 6:0:0:0: [sdf] Optimal transfer size 33553920 bytes not a multiple of physical block size (0 bytes)
[Tue Jul 25 15:58:52 2023] sd 6:0:0:0: [sdf] Attached SCSI disk

...
Note the following line:
[Tue Jul 25 15:58:52 2023] sd 6:0:0:0: Device offlined - not ready after error recovery
[Tue Jul 25 15:58:52 2023] sd 6:0:0:0: rejecting I/O to offline device
The line: Device offlined - not ready after error recovery indicates that the hard disk has failed, and its not possible to make it functional again using software.
The hard disk clearly was being detected and identified, but for some reason the system was not able to use it in any way.
Besides dmesg, there are other disk diagnostic tools on linux like smartctl that can read the S.M.A.R.T data from the disk and provide useful information about the cause of the failure. However the S.M.A.R.T data on this disk was not accessible as we shall see later.
Moreover this being a very new hard drive (less than an year old) and used very little, had no reason to go bad due to usage patterns.
Check hard drive with other commands
I also tried using different commands to see whether the system was able to connect to the hard drive and access anything on it. The commands include hwinfo, lsblk, fsck, parted, fdisk, dmesg, lsusb etc.
With failing or failed hard disks, it may be sometimes possible to read the data or recover it atleast partially. In-case of complete failure, software based methods might not work at all to rescue the data.
Then you can have to take it the service center for data recovery, if your drive has a data recovery services included like this seagate 5tb hard disk had.
1. hwinfo
The hwinfo command was able to show the usb hard disk - /dev/sdf Seagate One Touch w/PW
Here is the full output:
$ hwinfo --usb --short --block
keyboard:
  /dev/input/event4    Dell KB216 Wired Keyboard
mouse:
  /dev/input/mice      Microsoft Basic Optical Mouse v2.0
disk:
  /dev/sdf             Seagate One Touch w/PW
  /dev/sdd             Samsung Portable SSD T5
  /dev/sdb             Samsung SSD 850
  /dev/sde             Seagate Expansion HDD
  /dev/sdc             KINGSTON SA400S3
  /dev/sda             Samsung SSD 840
                       Seagate RSS LLC One Touch w/PW
                       Seagate RSS LLC Expansion HDD
                       Samsung Electronics Portable SSD T5
partition:
  /dev/sdd1            Partition
  /dev/sdb1            Partition
  /dev/sde1            Partition
  /dev/sdc1            Partition
  /dev/sda1            Partition
hub:
                       Genesys Logic USB3.1 Hub
                       Linux Foundation 2.0 root hub
                       Genesys Logic Hub
                       Linux Foundation 3.0 root hub
unknown:
  /dev/input/event7    Dell KB216 Wired Keyboard
enlightened@enlightened:~$
2. lsusb
The lsusb command also detects the Seagate HDD (since its connected via usb port). The output of lsusb confirms that the system is able to probe and recognise the hard disk and that it is not completely dead. Lets see what happens next.
$ lsusb
Bus 002 Device 008: ID 0bc2:200b Seagate RSS LLC Expansion HDD
Bus 002 Device 013: ID 0bc2:ab6e Seagate RSS LLC One Touch w/PW
Bus 002 Device 003: ID 04e8:61f5 Samsung Electronics Co., Ltd Portable SSD T5
Bus 002 Device 002: ID 05e3:0626 Genesys Logic, Inc. Hub
Bus 002 Device 001: ID 1d6b:0003 Linux Foundation 3.0 root hub
Bus 001 Device 004: ID 413c:2113 Dell Computer Corp. KB216 Wired Keyboard
Bus 001 Device 003: ID 045e:00cb Microsoft Corp. Basic Optical Mouse v2.0
Bus 001 Device 002: ID 05e3:0610 Genesys Logic, Inc. Hub
Bus 001 Device 001: ID 1d6b:0002 Linux Foundation 2.0 root hub
$
Further details could be fetched like this:
$ lsusb -s 002:013 -v

Bus 002 Device 013: ID 0bc2:ab6e Seagate RSS LLC One Touch w/PW
Couldn't open device, some information will be missing
Device Descriptor:
  bLength                18
  bDescriptorType         1
  bcdUSB               3.20
  bDeviceClass            0
  bDeviceSubClass         0
  bDeviceProtocol         0
  bMaxPacketSize0         9
  idVendor           0x0bc2 Seagate RSS LLC
  idProduct          0xab6e
  bcdDevice           17.07
  iManufacturer           1 Seagate
  iProduct                2 One Touch w/PW
  iSerial                 3 00000000NABX1ME0
  bNumConfigurations      1
...
3. lsblk
The lsblk command is used to see if the system can identify the partition table type and partitions on the drive.
The lsblk command detects the hard disk as "sdf" hdd device but does not show any "partition table type" PTTYPE and reports the size as 0B.
The size being reported as 0B is a sign of trouble. Because even if the drive is not formatted, lsblk should be able to query the size of the drive.
Note that I actually have 2 seagate hard disks connected to the system, first is a 1TB seagate expansion portable hdd and the second one is this 5TB failed one.
$ lsblk -e7 -o "NAME,PTTYPE,FSTYPE,SIZE,LABEL,PARTLABEL,PATH,PHY-SEC,VENDOR,KNAME"
NAME   PTTYPE FSTYPE   SIZE LABEL     PARTLABEL PATH      PHY-SEC VENDOR   KNAME
sda    dos           111.8G                     /dev/sda      512 ATA      sda
└─sda1 dos    ext4    95.4G                     /dev/sda1     512          sda1
sdb    dos           111.8G                     /dev/sdb      512 ATA      sdb
└─sdb1 dos    swap    95.8G                     /dev/sdb1     512          sdb1
sdc    gpt           447.1G                     /dev/sdc      512 ATA      sdc
└─sdc1 gpt    ext4     400G                     /dev/sdc1     512          sdc1
sdd    dos           465.8G                     /dev/sdd      512 Samsung  sdd
└─sdd1 dos    ext4     420G                     /dev/sdd1     512          sdd1
sde    dos           931.5G                     /dev/sde     4096 Seagate  sde
└─sde1 dos    exfat  931.5G Expansion           /dev/sde1    4096          sde1
sdf                      0B                     /dev/sdf      512 Seagate  sdf
$
4. fdisk
The next command is fdisk which tries to read partition tables and identify partitions and checks other details about the hardware on the disk. In our case fdisk could not detect the drive at all, which indicates that the partition table is un-readable or corrupt.
The command shall be as follows:
sudo fdisk -l | sed -e '/Disk \/dev\/loop/,+5d'
The sed piping has been done to remove the /dev/loop devices on ubuntu based systems and show only real disks and drives.
Here is the output of the command:
$ sudo fdisk -l | sed -e '/Disk \/dev\/loop/,+5d'
Disk /dev/sda: 111.79 GiB, 120034123776 bytes, 234441648 sectors
Disk model: Samsung SSD 840
Units: sectors of 1 * 512 = 512 bytes
Sector size (logical/physical): 512 bytes / 512 bytes
I/O size (minimum/optimal): 512 bytes / 512 bytes
Disklabel type: dos
Disk identifier: 0x00014603

Device     Boot Start       End   Sectors  Size Id Type
/dev/sda1  *     2048 199999487 199997440 95.4G 83 Linux


Disk /dev/sdb: 111.79 GiB, 120034123776 bytes, 234441648 sectors
Disk model: Samsung SSD 850
Units: sectors of 1 * 512 = 512 bytes
Sector size (logical/physical): 512 bytes / 512 bytes
I/O size (minimum/optimal): 512 bytes / 512 bytes
Disklabel type: dos
Disk identifier: 0x85398d1d

Device     Boot Start       End   Sectors  Size Id Type
/dev/sdb1        2048 200886271 200884224 95.8G 82 Linux swap / Solaris


Disk /dev/sdc: 447.13 GiB, 480103981056 bytes, 937703088 sectors
Disk model: KINGSTON SA400S3
Units: sectors of 1 * 512 = 512 bytes
Sector size (logical/physical): 512 bytes / 512 bytes
I/O size (minimum/optimal): 512 bytes / 512 bytes
Disklabel type: gpt
Disk identifier: 6F94811E-09F1-454D-BFE4-5B6AF164BBCF

Device     Start       End   Sectors  Size Type
/dev/sdc1   2048 838862847 838860800  400G Linux filesystem


Disk /dev/sdd: 465.76 GiB, 500107862016 bytes, 976773168 sectors
Disk model: Portable SSD T5
Units: sectors of 1 * 512 = 512 bytes
Sector size (logical/physical): 512 bytes / 512 bytes
I/O size (minimum/optimal): 512 bytes / 33553920 bytes
Disklabel type: dos
Disk identifier: 0xe82b5655

Device     Boot Start       End   Sectors  Size Id Type
/dev/sdd1        2048 880805887 880803840  420G 83 Linux


Disk /dev/sde: 931.51 GiB, 1000204885504 bytes, 1953525167 sectors
Disk model: Expansion HDD
Units: sectors of 1 * 512 = 512 bytes
Sector size (logical/physical): 512 bytes / 4096 bytes
I/O size (minimum/optimal): 4096 bytes / 4096 bytes
Disklabel type: dos
Disk identifier: 0x0131e7b6

Device     Boot Start        End    Sectors   Size Id Type
/dev/sde1        2048 1953523711 1953521664 931.5G  7 HPFS/NTFS/exFAT
$
Note that there is no "sdf" drive in the fdisk output. If fdisk fails to show the drive, chances are that the drive has failed for good and its not possible to recover anything via software methods.
5. parted
The parted command provides similar functionality to the fdisk command. The parted command also did not detect or show the drive indicating that something was surely wrong with the hard disk at the hardware level.
Beyond this point, any chances of success of recovery with software methods was getting over.
$ sudo parted  -l
Model: ATA Samsung SSD 840 (scsi)
Disk /dev/sda: 120GB
Sector size (logical/physical): 512B/512B
Partition Table: msdos
Disk Flags:

Number  Start   End    Size   Type     File system  Flags
 1      1049kB  102GB  102GB  primary  ext4         boot


Model: ATA Samsung SSD 850 (scsi)
Disk /dev/sdb: 120GB
Sector size (logical/physical): 512B/512B
Partition Table: msdos
Disk Flags:

Number  Start   End    Size   Type     File system     Flags
 1      1049kB  103GB  103GB  primary  linux-swap(v1)  swap


Model: ATA KINGSTON SA400S3 (scsi)
Disk /dev/sdc: 480GB
Sector size (logical/physical): 512B/512B
Partition Table: gpt
Disk Flags:

Number  Start   End    Size   File system  Name  Flags
 1      1049kB  429GB  429GB  ext4


Model: Samsung Portable SSD T5 (scsi)
Disk /dev/sdd: 500GB
Sector size (logical/physical): 512B/512B
Partition Table: msdos
Disk Flags:

Number  Start   End    Size   Type     File system  Flags
 1      1049kB  451GB  451GB  primary  ext4


Model: Seagate Expansion HDD (scsi)
Disk /dev/sde: 1000GB
Sector size (logical/physical): 512B/4096B
Partition Table: msdos
Disk Flags:

Number  Start   End     Size    Type     File system  Flags
 1      1049kB  1000GB  1000GB  primary


$
Note that there is no "sdf" drive which has been assigned to this 5TB hard drive. If fdisk and parted are not able to detect the drive, it is expected that other gui tools like Gparted would also not show this drive.
Gnome Disks
The Gnome Disks program also could not detect it.
So this usually happens when the partition table header (GPT or MBR) is not readable by the system. It is either not present, or corrupt. This causes linux to unable to identify the disk as a storage device.
However this disk in particular had data on it. And i needed some way to recover it.
Other solutions
The next thing i tried was swapping the connector cable with a new one (assuming that the cable might have gone bad). That theory did not bear any results. The original connector cable was working just fine.
Based on the above steps it can be concluded that the disk has some internal hardware failure that cannot be fixed through software. And its time to take it to the service center, since its currently under warranty period.
SeaTools - Recovery tool from Seagate
Since this was a seagate hard drive, it was worth checking out the support on their official website.
Seagate offers some free diagnosis tools to examine the hard disk and recover data from it if possible. These can be downloaded from the following link:
https://www.seagate.com/in/en/support/downloads/seatools/
The tool is called SeaTools and it is is available for both windows and linux, and there is a bootable version of SeaTools as well. SeaTools bootable is based on Tiny Core Linux and has the drive rescue and diagnostic tools packaged in it.
I first tried seaTools 5 for windows but it did not help. The tool either could not detect the hdd when connected or even if it was detected trying to access it made seatools crash constantly.
This is how seatools 5 looks on windows. Note that it can detect the One Touch 5 TB hard drive.
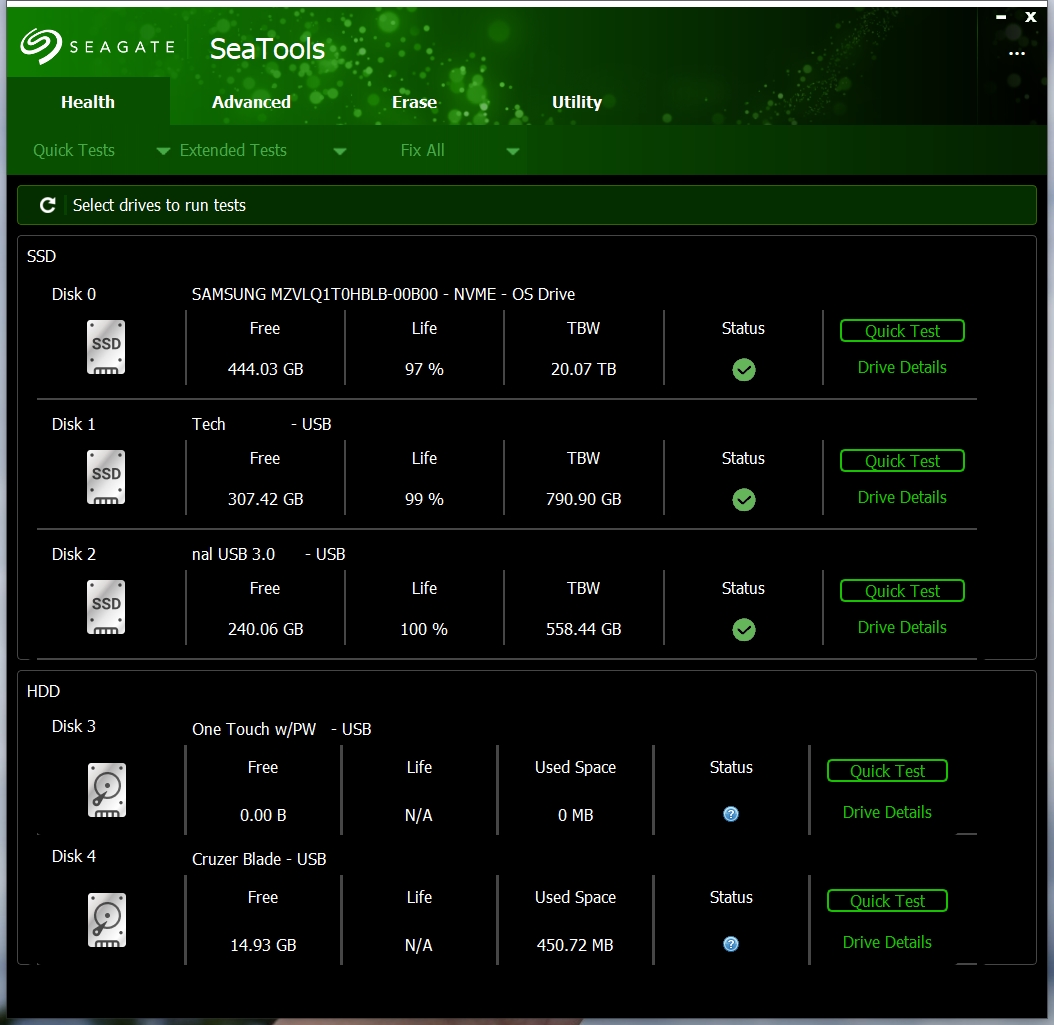
Seagate Seatools 5 Windows
Clicking details next to the dead hard drive shows corrupt information.
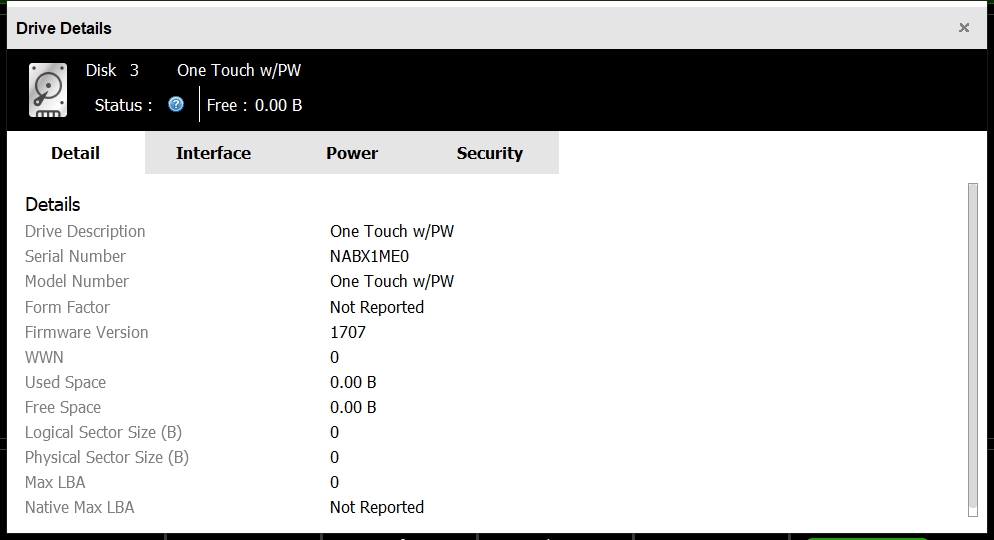
Seatools 5 Windows Drive Details
Ideally for a healthy disk (hdd or ssd) the S.M.A.R.T data is accessible like this 1 TB samsung nvme ssd.
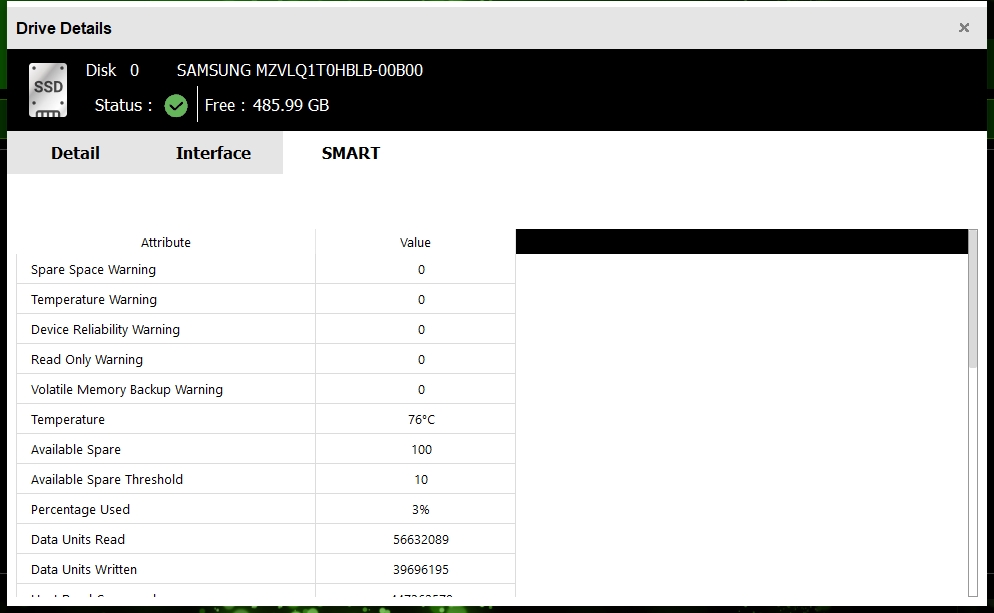
Seatools 5 Windows Smart Data
Seagate Bootable
Next I decided to try SeaTools bootable. For me SeaTools bootable had issues booting on uefi based systems. So i have to boot it on an old bios based system where it worked properly.
The same problem persisted. The disk either did not show up or even if it did trying to access made the whole system unstable.
Done with it
Finally i was done with this hard drive, and took it to the service center and received a replacement!
How is data recovered from failed hard drives
At this point you might be curious to know how data is recovered from failed hard drives. Quite a coincidence, i came across a youtube video just recently that shows the process. You can check it here: