FFmpeg can work with a lot of different codecs for both encoding and decoding video files. It is used as a backend by video editors like Shotcut and media processing library frameworks like MLT Multimedia Framework.
In this post we shall take a look at some of the most commonly used video codecs, their features and how they can be used inside ffmpeg for encoding and decoding videos.
We shall be covering codecs like ut video, mjpeg, prores, dnxhd/hr, h264 (av1), h265 (hevc) etc.
Check Video Details
The ffprobe command can be used to examine the video file details like the current codec, bitrate, resolution etc. The usage is quite simple
ffprobe input_file
So here we have a video file downloaded from youtube. We can check the details using the ffprobe command.
PS C:\videotestsk> ffprobe .\nature_film_4k.webm -hide_banner
Input #0, matroska,webm, from '.\nature_film_4k.webm':
  Metadata:
    ENCODER         : Lavf59.27.100
  Duration: 01:00:25.40, start: -0.007000, bitrate: 16990 kb/s
  Stream #0:0(eng): Video: vp9 (Profile 0), yuv420p(tv, bt709), 3840x2160, SAR 1:1 DAR 16:9, 30 fps, 30 tbr, 1k tbn (default)
    Metadata:
      DURATION        : 01:00:25.367000000
  Stream #0:1(eng): Audio: opus, 48000 Hz, stereo, fltp (default)
    Metadata:
      DURATION        : 01:00:25.401000000
>
Look at the lines titled "Duration" and "Stream". The first stream is usually the video for a video file, while the next stream is the audio. The details for this file can be summarized as follows:
Container: WebM
Codec: VP9
Resolution: 3840x2160
FPS: 30
Bitrate: 16840 kb/s
Duration: 01:00:25
Size: 7.17 GB
Colorspace (Pixel Format): yuv420p(tv, bt709)
The colorspace might be a confusing concept for some of the readers. Check out this detailed guide on ffmpeg on colorspaces.
HDR Video
VLC Player can also show the codec and metadata information of a video file. Simply open the video in vlc player and pause the video. Then click Tools > Codec Information. Or use the keyboard shortcut Ctrl+J.
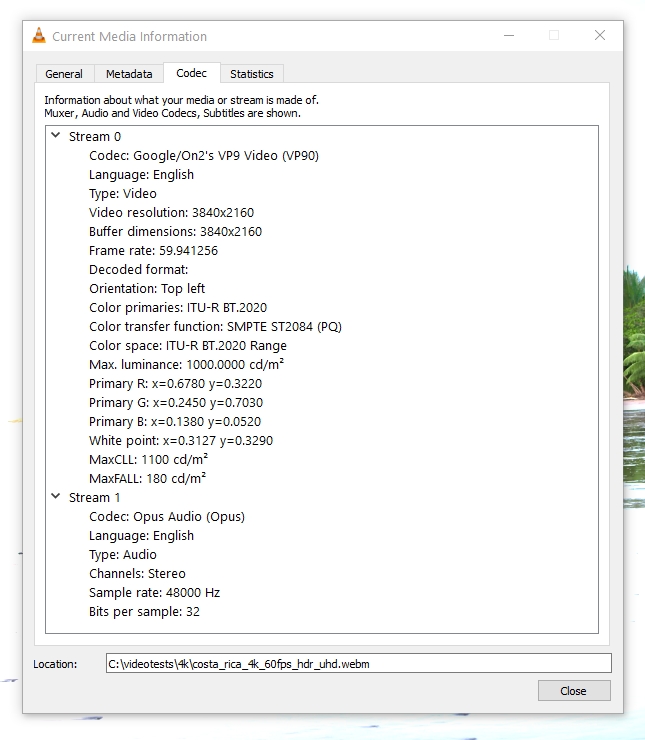
VLC Player Codec Details - Costa Rica HDR Video
The ffprobe output for an hdr video file would look like this:
ffprobe .\costa_rica_4k_60fps_hdr_uhd.webm -hide_banner
Input #0, matroska,webm, from '.\costa_rica_4k_60fps_hdr_uhd.webm':
  Metadata:
    ENCODER         : Lavf59.27.100
  Duration: 00:05:13.80, start: -0.007000, bitrate: 28952 kb/s
  Stream #0:0(eng): Video: vp9 (Profile 2), yuv420p10le(tv, bt2020nc/bt2020/smpte2084), 3840x2160, SAR 1:1 DAR 16:9, 59.94 fps, 59.94 tbr, 1k tbn (default)
    Metadata:
      DURATION        : 00:05:13.780000000
    Side data:
      Content Light Level Metadata, MaxCLL=1100, MaxFALL=180
      Mastering Display Metadata, has_primaries:1 has_luminance:1 r(0.6780,0.3220) g(0.2450,0.7030) b(0.1380 0.0520) wp(0.3127, 0.3290) min_luminance=0.000000, max_luminance=1000.000000
  Stream #0:1(eng): Audio: opus, 48000 Hz, stereo, fltp (default)
    Metadata:
      DURATION        : 00:05:13.801000000
>
The line that indicates hdr is:
yuv420p10le(tv, bt2020nc/bt2020/smpte2084)
Now we shall try to transcode this particular video file using different codecs. We shall convert only a short part (the first 10 seconds: using the ss and t options) to keep the experiments short and simple. If you want to convert a whole video you can remove the -ss and -t options
Using Codecs with FFmpeg
FFmpeg supports a huge number of codecs, however in this post we shall limit ourselves only to some of the popular ones and learn to use them in ffmpeg. If you want to check whether a particular encoder is supported by ffmpeg, use the following command:
> ffmpeg -encoders -hide_banner | findstr /c:"mpeg"
 V.S... ffv1                 FFmpeg video codec #1
 VF.... ffvhuff              Huffyuv FFmpeg variant
 V.S... mpeg1video           MPEG-1 video
 V.S... mpeg2video           MPEG-2 video
 V..... mpeg2_qsv            MPEG-2 video (Intel Quick Sync Video acceleration) (codec mpeg2video)
 V.S... mpeg4                MPEG-4 part 2
 V..... libxvid              libxvidcore MPEG-4 part 2 (codec mpeg4)
 V..... msmpeg4v2            MPEG-4 part 2 Microsoft variant version 2
 V..... msmpeg4              MPEG-4 part 2 Microsoft variant version 3 (codec msmpeg4v3)
>
On linux use the grep command to filter the ffmpeg output.
The codecs we shall be covering in this article include:
- MPEG-4 (Part 2) / Xvid - Most popular before H.264
- UT Video - Lossless format. Suitable for video editing
- MJPEG - Motion JPEG. Intra-frame coding/compression.
- Apple Prores - Successor of "Apple Intermediate Codec". Suitable profiles for video editing/post production
- Avid DNxHD / DNxHR - Suitable profiles for editing/post production
- H.264 - Most widely used standard, supports gpu encoding. Suitable for delivery/distribution
- H.265 / HEVC - Successor of H.264
- VP9 - Used by youtube for 4K/8K and HDR videos
- AV1 - AOMedia Video 1. Successor of VP9. Used by youtube for 4K/8K and HDR videos
1. MPEG-4 (MPEG-4 Part 2)
MPEG-4 (technically MPEG-4 Part 2) was the most widely used video compression format before it was superseded by Mpeg-4 Part 10 (H.264) standard. It was an improvement over the previous standard MPEG-2.
To encode a video using this codec use the following command:
ffmpeg -hide_banner -y -i .\peru-4k-sdr.libx264.mp4 -c:v mpeg4 -ss 0 -t 10 peru-10s.mpeg4.mp4
The MPEG-4 standard defines many different "profiles" like SP (Simple Profile), ASP (Advanced Simple Profile), SSTP (Simple Studio Profile). MPEG-4 supports only 8-bit colors. FFmpeg has a page here explaining quality control parameters for this codec.
Xvid
Xvid is another free and open source video encoding/decoding library that implements the MPEG-4 Part 2 ASP and supported in ffmpeg.
ffmpeg -hide_banner -y -i .\peru-4k-sdr.libx264.mp4 -c:v libxvid -q:v 10 -ss 0 -t 10 peru-10s.libxvid.mp4
I noticed that the nvidia hardware decoder (NVDEC) can decode MPEG-1 and MPEG-2 videos but not MPEG-4 videos. The same can be verified from nvidia's video support matrix data on this page.
2. UT Video
The UT Video codec is an old one and uses minimal compression resulting in large file sizes. It is ideal as a editing format for tools like Shotcut. The container used is avi. We can also use the mkv container with utvideo codec.
ffmpeg -hide_banner -i .\nature_film_4k.webm -c:v utvideo -ss 0 -t 10 .\nature_film_4k.utvideo.avi
ffmpeg -hide_banner -i .\nature_film_4k.webm -c:v utvideo -ss 0 -t 10 .\nature_film_4k.utvideo.avi
Input #0, matroska,webm, from '.\nature_film_4k.webm':
  Metadata:
    ENCODER         : Lavf59.27.100
  Duration: 01:00:25.40, start: -0.007000, bitrate: 16990 kb/s
  Stream #0:0(eng): Video: vp9 (Profile 0), yuv420p(tv, bt709), 3840x2160, SAR 1:1 DAR 16:9, 30 fps, 30 tbr, 1k tbn (default)
    Metadata:
      DURATION        : 01:00:25.367000000
  Stream #0:1(eng): Audio: opus, 48000 Hz, stereo, fltp (default)
    Metadata:
      DURATION        : 01:00:25.401000000
Stream mapping:
  Stream #0:0 -> #0:0 (vp9 (native) -> utvideo (native))
  Stream #0:1 -> #0:1 (opus (native) -> mp3 (libmp3lame))
Press [q] to stop, [?] for help
Output #0, avi, to '.\nature_film_4k.utvideo.avi':
  Metadata:
    ISFT            : Lavf59.27.100
  Stream #0:0(eng): Video: utvideo (ULH0 / 0x30484C55), yuv420p(tv, bt709, progressive), 3840x2160 [SAR 1:1 DAR 16:9], q=2-31, 200 kb/s, 30 fps, 30 tbn (default)
    Metadata:
      DURATION        : 01:00:25.367000000
      encoder         : Lavc59.37.100 utvideo
  Stream #0:1(eng): Audio: mp3 (U[0][0][0] / 0x0055), 48000 Hz, stereo, fltp (default)
    Metadata:
      DURATION        : 01:00:25.401000000
      encoder         : Lavc59.37.100 libmp3lame
frame=  300 fps= 84 q=-0.0 Lsize= 1160072kB time=00:00:10.00 bitrate=949571.4kbits/s speed=2.82x
video:1159884kB audio:157kB subtitle:0kB other streams:0kB global headers:0kB muxing overhead: 0.002708%
PS C:\videotestsk>
Duration: 10 seconds.
Size: 1.10 GB.
Pro Tip: If you want to just run a dry test of encoding the video, without actually writing a file, then output the whole thing to null stream and monitor the system resource load. Here is an example:
ffmpeg -hide_banner -i .\nature_film_4k.webm -c:v utvideo -ss 0 -t 10 -f null -
3. MJPEG (Motion JPEG)
In the mjpeg format each frame is compressed a separate jpg frame without any dependency on the previous or next frames (like in IPB compression used in h.264). Its more like an All-I format h.264 file. Consequently the video files are much larger in size, typically 3-5 times larger than an h264 file. Mjpeg is now an old (obsolete ?) codec, with better alternatives available.
Because it uses intra-frame compression and compress lossless-ly, it can be used for video editing purposes. It needs much less cpu processing when decoding.
Containers: Supported containers that can be used with this compression format are avi, mkv and mov. I noticed that if mp4 container is used with this codec, then the videos do not play properly and only the audio plays.
Note: If you want to open mjpeg video files in Davinci, then you must wrap them in mov container.
To use mjpeg codec with ffmpeg use the following command:
ffmpeg -hide_banner -y -i .\nature_film_4k.webm -vcodec mjpeg -ss 0 -t 10 output.mjpeg.avi
Quality Control: The quality can be controlled using the "-q:v" option with values from 1-31. Lower value means higher quality with 1 being the best quality and 31 being the worst.
ffmpeg -hide_banner -y -i .\peru-4k-sdr.libx264.mp4 -c:v mjpeg -q:v 5 .\peru-4k-sdr.mjpeg.qv5.mp4
List of supported options can be viewed with this command:
ffmpeg -h encoder=mjpeg -hide_banner
JPEG2000 - Motion JPEG 2000
This particular codec uses a similar approach to MJPEG. It compresses each frame in a video separately with JPG2000 compression algorithm which is better than MJPEG. It offers better compression with higher quality.
I noticed that it takes a lot more time compared to MJPEG to encode videos.
4. Apple Prores
Its the successor of Apple Intermediate codec and used for post-production editing and used in apps like Final Cut Pro. It has different profiles like ProRes 422 Proxy, ProRes 422 LT, ProRes 422 , ProRes 422 HQ, ProRes 4444. Each profile has different set of features in terms of compression level, alpha channel support, maximum supported resolution etc.
- ProRes 422 Proxy
- ProRes 422 LT
- ProRes 422
- ProRes 422 HQ
- ProRes 4444
To learn more about the profiles, check this support page on apple.com
Inside of ffmpeg, there are actually 3 different encoders for prores, namely prores, prores_aw and prores_ks. The prores_ks has most features and we can check the supported options like this:
ffmpeg -h encoder=prores_ks -hide_banner
Encoder prores_ks [Apple ProRes (iCodec Pro)]:
    General capabilities: threads
    Threading capabilities: frame and slice
    Supported pixel formats: yuv422p10le yuv444p10le yuva444p10le
ProRes encoder AVOptions:
  -mbs_per_slice     <int>        E..V....... macroblocks per slice (from 1 to 8) (default 8)
  -profile           <int>        E..V....... (from -1 to 5) (default auto)
     auto            -1           E..V.......
     proxy           0            E..V.......
     lt              1            E..V.......
     standard        2            E..V.......
     hq              3            E..V.......
     4444            4            E..V.......
     4444xq          5            E..V.......
  -vendor            <string>     E..V....... vendor ID (default "Lavc")
  -bits_per_mb       <int>        E..V....... desired bits per macroblock (from 0 to 8192) (default 0)
  -quant_mat         <int>        E..V....... quantiser matrix (from -1 to 6) (default auto)
     auto            -1           E..V.......
     proxy           0            E..V.......
     lt              2            E..V.......
     standard        3            E..V.......
     hq              4            E..V.......
     default         6            E..V.......
  -alpha_bits        <int>        E..V....... bits for alpha plane (from 0 to 16) (default 16)

\...>
Note that 4:2:0 color spaces are not supported by prores. So if you have a video that is already using yuv420p or yuv420p10le, then do not try to convert it to prores as it would lead to deterioration. Use an alternative codec like ut video, mjpeg
Note the list of profile and corresponding numeric id.
To convert a video to prores format we can use a command like this:
ffmpeg -hide_banner -y -i .\nature_film_4k.webm -c:v prores_ks -profile:v hq -ss 20 -t 10 output.prores.mov
Note: that some media players like VLC 3.0.18 cannot play prores video with alpha channel. You can verify that the video is playing fine using ffplay command.
ffplay output.prores.mov -vf "scale=1920:1080"
5. Avid DNxHD / DNxHR
DNxHD falls in the category known as Intermediate (Mezzanine) codecs similar to Prores. It uses less compression making it ideal for editing and color grading in post production. As a rule of thumb, any codec that uses light compression (or can be decompressed quickly without loading the cpu too much) is ideal for editing.
If you work with a dnxhr video in davinci for example, you would notice that you can scrub on the timeline a lot more smoothly in realtime, compared to h264/hevc. This is because for any moment of time, the cpu has to do much less processing to generated the desired frame.
The profiles supported by dnxhd can be listed like this:
PS C:\videotestsk> ffmpeg -h encoder=dnxhd -hide_banner
Encoder dnxhd [VC3/DNxHD]:
    General capabilities: dr1 threads
    Threading capabilities: frame and slice
    Supported pixel formats: yuv422p yuv422p10le yuv444p10le gbrp10le
dnxhd AVOptions:
  -nitris_compat     <boolean>    E..V....... encode with Avid Nitris compatibility (default false)
  -ibias             <int>        E..V....... intra quant bias (from INT_MIN to INT_MAX) (default 0)
  -profile           <int>        E..V....... (from 0 to 5) (default dnxhd)
     dnxhd           0            E..V.......
     dnxhr_444       5            E..V.......
     dnxhr_hqx       4            E..V.......
     dnxhr_hq        3            E..V.......
     dnxhr_sq        2            E..V.......
     dnxhr_lb        1            E..V.......

PS C:\videotestsk>
The profiles are:
| Profile | Color sampling | Description | Usage | Prores Equivalent |
| dnxhd | For resolution upto 1440x1080 | |||
| dnxhr_444 | 4:4:4 | Finishing quality 4:4:4 / Cinema Quality Delivery | Finishing | ProRes 444 |
| dnxhr_hqx | 4:2:2 | High Quality Extended 10-bit / 4K-UHD broadcast | Finishing | ProRes 422HQ |
| dnxhr_hq | 4:2:2 | High Quality / roughly | Mezzanine | ProRes 422 |
| dnxhr_sq | 4:2:2 | Standard Quality / Suitable Delivery/roughly | Editing | ProRes LT |
| dnxhr_lb | 4:2:2 | Low bitrate / Offline quality / roughly | Editing | ProRes Proxy |
Note that dnxhd/hr does not support 4:2:0 color space. So if you have a video that is using pixel format "yuv420p10le" for example, do not try to convert it to dnxhr_* formats since it would try to convert it to 4:2:2 which would result in degradation of the colors
ffprobe .\costa_rica_4k_60fps_hdr_uhd.webm -hide_banner
Input #0, matroska,webm, from '.\costa_rica_4k_60fps_hdr_uhd.webm':
  Metadata:
    ENCODER         : Lavf59.27.100
  Duration: 00:05:13.80, start: -0.007000, bitrate: 28952 kb/s
  Stream #0:0(eng): Video: vp9 (Profile 2), yuv420p10le(tv, bt2020nc/bt2020/smpte2084), 3840x2160, SAR 1:1 DAR 16:9, 59.94 fps, 59.94 tbr, 1k tbn (default)
    Metadata:
      DURATION        : 00:05:13.780000000
    Side data:
      Content Light Level Metadata, MaxCLL=1100, MaxFALL=180
      Mastering Display Metadata, has_primaries:1 has_luminance:1 r(0.6780,0.3220) g(0.2450,0.7030) b(0.1380 0.0520) wp(0.3127, 0.3290) min_luminance=0.000000, max_luminance=1000.000000
  Stream #0:1(eng): Audio: opus, 48000 Hz, stereo, fltp (default)
    Metadata:
      DURATION        : 00:05:13.801000000
PS C:\videotestsk>
Containers: Containers supported MOV or MXF
There is this pdf from avid which explains the codec features in great details. Check page 111. Another resource is here for codec bandwidth details.
With the DNxHD/HR codecs its very important to specify the correct parameters like resolution, frame rate, pixel format and bitrate. Otherwise the encoding would fail to proceed.
For dnxhd the valid bitrate and pixel format information can be retrieved with this dummy command:
ffmpeg -loglevel error -f lavfi -i testsrc2 -c:v dnxhd -f null -
Frame size: 1920x1080p; bitrate: 175Mbps; pixel format: yuv422p10
Frame size: 1920x1080p; bitrate: 185Mbps; pixel format: yuv422p10
Frame size: 1920x1080p; bitrate: 365Mbps; pixel format: yuv422p10
Frame size: 1920x1080p; bitrate: 440Mbps; pixel format: yuv422p10
...
Output a 10 seconds clip of the source video to DNxHR_HQ format.
ffmpeg -hide_banner -y -i .\nature_film_4k.webm -c:v dnxhd -vf "scale=3840:2160,fps=30,format=yuv422p" -profile:v dnxhr_hq -b:v 874M -ss 0 -t 10 output-10s.dnxhr_hq.mov
File Size: 1.01 GB
The file size is going to be big since dnxhr is designed to be an intermediate codec suitable for editing.
Benchmark Runtime: To benchmark the system performance can use the "-benchmark" option and check the runtime.
ffmpeg -hide_banner -y -i .\nature_film_4k.webm -c:v dnxhd -vf "scale=3840:2160,fps=30,format=yuv422p" -profile:v dnxhr_hq -b:v 874M -ss 0 -t 10 output-10s.dnxhr_hq.mov -benchmark
In the output check the rtime field value which indicates the total running time for the transcoding process.
Fun Fact:
The ram consumption during transcoding will depend on the number of available cpu cores. If you have fewer cores, but high ram, then the ram utilization will stay low, since the program cannot spawn multiple threads beyond a certain point.
6. H.264
This is the most popular codec in use today. Technically its known as MPEG-4 Part 10 (AVC). Most video editor applications can export to h.264 and some use this as the default codec for exporting. This codec is primarily designed for high level of compression and distribution. Overall the size of files created with this codec are much smaller compared to other formats discussed above.
Most gpus (infact all modern ones) from nvidia, amd and intel have hardware encoders and decoders for this particular format.
- Nvidia NVENC/NVDEC
- AMD AMF
- Intel Quick Sync
If you have a supporting gpu on your system ffmpeg can use hardware acceleration for both encoding and decoding. Else you can use cpu based encoder/decoder.
On my system i see the support for h264_amf, h264_nvenc encoders as shown below. This means that i can use hardware acceleration for encoding h264 videos.
ffmpeg -codecs -hide_banner | findstr /c:"h264"
 DEV.LS h264                 H.264 / AVC / MPEG-4 AVC / MPEG-4 part 10 (decoders: h264 h264_qsv h264_cuvid ) (encoders: libx264 libx264rgb h264_amf h264_mf h264_nvenc h264_qsv )
...>
Note that libx264 is the cpu based encoder. The following command will encode the video to h264 using cpu based encoder copying the audio codec as it is.
ffmpeg -hide_banner -y -i .\nature_film_4k.webm -c:v libx264 -ss 20 -t 10 output.libx264.mp4
The -profile:v option can be used to specify the profile which can be one of the following:
- baseline
- main
- high
Using the high profile.
ffmpeg -i input.mp4 -c:v libx264 -profile:v high output.mp4
Converting HDR videos: The libx264 cpu based encoder works well with hdr videos as well. HDR videos use a different colorspace and transfer characteristics. Here is a quick example of an hdr video.
ffprobe -hide_banner costa_rica_4k_60fps_hdr_uhd.webm
Input #0, matroska,webm, from 'costa_rica_4k_60fps_hdr_uhd.webm':
  Metadata:
    ENCODER         : Lavf59.27.100
  Duration: 00:05:13.80, start: -0.007000, bitrate: 28952 kb/s
  Stream #0:0(eng): Video: vp9 (Profile 2), yuv420p10le(tv, bt2020nc/bt2020/smpte2084), 3840x2160, SAR 1:1 DAR 16:9, 59.94 fps, 59.94 tbr, 1k tbn (default)
...
Now lets convert it to h264 using the libx264 codec.
ffmpeg -hide_banner -y -i .\costa_rica_4k_60fps_hdr_uhd.webm -c:v libx264 -ss 5 -t 15 costa-10s.libx264.mp4
The output video is compact in size with decent quality and plays fine in vlc player.
Now check the details of the output video costa-10s.libx264.mp4 with ffprobe:
ffprobe -hide_banner  costa-10s.libx264.mp4
Input #0, mov,mp4,m4a,3gp,3g2,mj2, from 'costa-10s.libx264.mp4':
  Metadata:
    major_brand     : isom
    minor_version   : 512
    compatible_brands: isomiso2avc1mp41
    encoder         : Lavf59.27.100
  Duration: 00:00:15.02, start: 0.000000, bitrate: 10717 kb/s
  Stream #0:0[0x1](eng): Video: h264 (High 10) (avc1 / 0x31637661), yuv420p10le(tv, bt2020nc/bt2020/smpte2084, progressive), 3840x2160 [SAR 1:1 DAR 16:9], 10576 kb/s, 59.94 fps, 59.94 tbr, 19001 tbn (default)
...
As we can see that the colorspace is totally preserved and is the same as the source file: yuv420p10le(tv, bt2020nc/bt2020/smpte2084, progressive)
Encoding with Nvidia NVENC:
Encoding with Nvidia hardware encoder will be significantly faster than the cpu based encoder. Here is a quick example
ffmpeg -hide_banner -y -i .\nature_film_4k.webm -c:v h264_nvenc -ss 0 -t 10 output.h264_nvenc.mp4
File Size: 89MB. Size is very small due to heavy compression (low quality)
The h264_nvenc encoder has the following profiles that control quality and size parameters.
...
  -profile           <int>        E..V....... Set the encoding profile (from 0 to 3) (default main)
     baseline        0            E..V.......
     main            1            E..V.......
     high            2            E..V.......
     high444p        3            E..V.......
...
Lets try a better quality.
ffmpeg -hide_banner -y -i .\nature_film_4k.webm -c:v h264_nvenc -ss 0 -t 10 output.h264_nvenc.mp4
10-bit encoding not supported: There are quite a few drawbacks to the nvidia nvenc hardware encoder. Firstly it does not support 10-bit color spaces like yuv420p10le.
ffmpeg -h encoder=h264_nvenc -hide_banner
Encoder h264_nvenc [NVIDIA NVENC H.264 encoder]:
    General capabilities: dr1 delay hardware
    Threading capabilities: none
    Supported hardware devices: cuda cuda d3d11va d3d11va
    Supported pixel formats: yuv420p nv12 p010le yuv444p p016le yuv444p16le bgr0 bgra rgb0 rgba x2rgb10le x2bgr10le gbrp gbrp16le cuda d3d11
h264_nvenc AVOptions:
  -preset            <int>        E..V....... Set the encoding preset (from 0 to 18) (default p4)
     default         0            E..V.......
     slow            1            E..V....... hq 2 passes
     medium          2            E..V....... hq 1 pass
     fast            3            E..V....... hp 1 pass
     hp              4            E..V.......
...
If you try to convert a video which is encoded with yuv420p10le using this encoder, it will fail with an error message.
> ffmpeg -hide_banner -y -i .\costa_rica_4k_60fps_hdr_uhd.webm -c:v h264_nvenc -b:v 0 -ss 5 -t 15  costa-10s.h264_nvenc.mp4
Input #0, matroska,webm, from '.\costa_rica_4k_60fps_hdr_uhd.webm':
...
  Stream #0:0(eng): Video: vp9 (Profile 2), yuv420p10le(tv, bt2020nc/bt2020/smpte2084), 3840x2160, SAR 1:1 DAR 16:9, 59.94 fps, 59.94 tbr, 1k tbn (default)
...
[h264_nvenc @ 000001263212f080] 10 bit encode not supported
[h264_nvenc @ 000001263212f080] No capable devices found
Error initializing output stream 0:0 -- Error while opening encoder for output stream #0:0 - maybe incorrect parameters such as bit_rate, rate, width or height
[aac @ 0000012632131580] Qavg: 164.678
[aac @ 0000012632131580] 2 frames left in the queue on closing
Conversion failed!
>
One way to work around this is to specify a pixel format like this:
ffmpeg -hide_banner -y -i .\costa_rica_4k_60fps_hdr_uhd.webm -c:v h264_nvenc -b:v 0 -pix_fmt yuv420p -ss 5 -t 15 costa-10s.h264_nvenc.mp4
H.264 HDR decoding not supported: NVDEC cannot decode hdr videos encoded with h264. So cpu processing will be used to play h264 hdr videos.
Intel Quick Sync:
Intel gpus have the intel quick sync technology that supports encoding and decoding h264 and hevc formats and are usable from within ffmpeg. In a previous article we talked about using intel quick sync with ffmpeg on ubuntu
AMD AMF
AMD cpus on laptops like the 5800H have integrated gpus with encoder modules that can be used to encode to h264. I use them to encode my fortnite gameplay via obs studio which supports using AMD H.264 for hardware accelerated screen capture.
The codec for encoding to h264 with amd hardware acceleration is h264_amf and here is how you would use it
ffmpeg -hide_banner -y -i .\costa_rica_4k_60fps_hdr_uhd.webm -c:v h264_amf -b:v 0 -ss 5 -t 15 costa-10s.h264_amf.mp4
Preserve Quality: Note that setting the bitrate to 0, will preserve the original quality without having to specify any other parameters. This is the same trick that works for nvidia hardware encoder h264_nvenc as well.
Washed out color: In the above example we are converting an hdr video to h264 using the amf hardware encoder. The resulting video will likely have faded/washed out colors. This is because amd gpu encoder does not support the color spaces required for hdr, and will convert to something much poor in visual quality.
Possible Error: In this particular conversion when i verified the generated video file i noticed something unusual. When checking with ffprobe this showed up
> ffprobe  costa-10s.h264_amf.mp4 -hide_banner
Input #0, mov,mp4,m4a,3gp,3g2,mj2, from 'costa-10s.h264_amf.mp4':
...
  Duration: 00:00:15.02, start: 0.000000, bitrate: 20144 kb/s
  Stream #0:0[0x1](eng): Video: h264 (Main) (avc1 / 0x31637661), yuv420p(tv, bt709/reserved/reserved, progressive), 3840x2160 [SAR 1:1 DAR 16:9], 20006 kb/s, 59.94 fps, 59.94 tbr, 19001 tbn (default)
...
If you note the video stream information we can see that the colorspace has changed quite a bit: yuv420p(tv, bt709/reserved/reserved, progressive)
-pix_fmt = yuv420p
-color_range = tv
-colorspace = bt709
-color_primaries = reserved
-color_trc = reserved
Note that the color_primaries and color_trc is showing reserved. Reserved indicates unsupported or invalid values. In the current context it simply means that the encoder does not support HDR so it will fallback to sdr colorspaces or simply refuse to encode with a "Conversion failed!" message like below.
ffmpeg -hide_banner -y -i .\costa_rica_4k_60fps_hdr_uhd.webm -c:v h264_amf -b:v 0 -vf "colorspace=space=bt709:trc=bt709:primaries=bt709" -pix_fmt yuv420p -ss 5 -t 2 costa-2s.h264_amf.mp4
Output:
> ffmpeg -hide_banner -y -i .\costa_rica_4k_60fps_hdr_uhd.webm -c:v h264_amf -b:v 0 -vf "colorspace=space=bt709:trc=bt709:primaries=bt709" -pix_fmt yuv420p -ss 5 -t 2  costa-2s.h264_amf.mp4
Input #0, matroska,webm, from '.\costa_rica_4k_60fps_hdr_uhd.webm':
  Metadata:
    ENCODER         : Lavf59.27.100
  Duration: 00:05:13.80, start: -0.007000, bitrate: 28952 kb/s
  Stream #0:0(eng): Video: vp9 (Profile 2), yuv420p10le(tv, bt2020nc/bt2020/smpte2084), 3840x2160, SAR 1:1 DAR 16:9, 59.94 fps, 59.94 tbr, 1k tbn (default)
    Metadata:
      DURATION        : 00:05:13.780000000
    Side data:
      Content Light Level Metadata, MaxCLL=1100, MaxFALL=180
      Mastering Display Metadata, has_primaries:1 has_luminance:1 r(0.6780,0.3220) g(0.2450,0.7030) b(0.1380 0.0520) wp(0.3127, 0.3290) min_luminance=0.000000, max_luminance=1000.000000
  Stream #0:1(eng): Audio: opus, 48000 Hz, stereo, fltp (default)
    Metadata:
      DURATION        : 00:05:13.801000000
Stream mapping:
  Stream #0:0 -> #0:0 (vp9 (native) -> h264 (h264_amf))
  Stream #0:1 -> #0:1 (opus (native) -> aac (native))
Press [q] to stop, [?] for help
[Parsed_colorspace_0 @ 0000023088f72280] Unsupported input transfer characteristics 16 (smpte2084)
Error while filtering: Invalid argument
Failed to inject frame into filter network: Invalid argument
Error while processing the decoded data for stream #0:0
[aac @ 0000023088eccb00] Qavg: nan
Conversion failed!
>
The original source file structure was like this:
-pix_fmt = yuv420p10le
-color_range = tv
-colorspace = bt2020nc
-color_primaries = bt2020
-color_trc (color transfer characteristics) = smpte2084
This implies that the amd h264 encoder does not support the color_primary bt2020 (needed for uhd) and color_trc=smpte2084 (perceptual quantizer transfer function needed for HDR)
The resulting video had pale or washed out colors as a result
A possible work around this is to apply filters on the video to convert it from hdr to sdr in order to preserve the colors as close to the original ones as possible.
Here is a possible command:
> ffmpeg -hide_banner -y -i .\costa_rica_4k_60fps_hdr_uhd.webm -vf "zscale=t=linear:npl=100,format=gbrpf32le,zscale=p=bt709,tonemap=tonemap=hable:desat=0,zscale=t=bt709:m=bt709:r=tv,format=yuv420p" -c:v h264_amf -b:v 0 -ss 5 -t 10 .\costa-10s-sdr.h264_amf.mp4
In the above command the video is passed through a series of filters in chain, that work to convert it from hdr to sdr, and then in the final step it is encoded with h264_amf encoder which produces the final video. With this technique the colors are preserved very well.
Supported Options
Now lets take a quick look at the options supported by h264_amf. Note that it has limited color space support. yuv420p is supported but there is no support for yuv420p10le. This implies that if you try to encode a source video which is in yuv420p10le or any other higher quality pixel format, there will be inevitable loss of color information and quality.
This is one drawback of the amd hardware encoder, that limits its application.
ffmpeg -h encoder=h264_amf -hide_banner
Encoder h264_amf [AMD AMF H.264 Encoder]:
    General capabilities: dr1 delay hardware
    Threading capabilities: none
    Supported hardware devices: d3d11va d3d11va dxva2 dxva2
    Supported pixel formats: nv12 yuv420p d3d11 dxva2_vld
h264_amf AVOptions:
  -usage             <int>        E..V....... Encoder Usage (from 0 to 3) (default transcoding)
     transcoding     0            E..V....... Generic Transcoding
     ultralowlatency 1            E..V.......
     lowlatency      2            E..V.......
     webcam          3            E..V....... Webcam
  -profile           <int>        E..V....... Profile (from 66 to 257) (default main)
     main            77           E..V.......
     high            100          E..V.......
     constrained_baseline 256          E..V.......
     constrained_high 257          E..V.......
  -level             <int>        E..V....... Profile Level (from 0 to 62) (default auto)
     auto            0            E..V.......
     1.0             10           E..V.......
     1.1             11           E..V.......

...
7. HEVC/H.265
This is supposed to be the successor of h264. Supported encoders and decoders in ffmpeg can be checked with the following command.
ffmpeg -encoders -hide_banner | findstr /c:"hevc"
 V....D libx265              libx265 H.265 / HEVC (codec hevc)
 V....D hevc_amf             AMD AMF HEVC encoder (codec hevc)
 V....D hevc_mf              HEVC via MediaFoundation (codec hevc)
 V....D hevc_nvenc           NVIDIA NVENC hevc encoder (codec hevc)
 V..... hevc_qsv             HEVC (Intel Quick Sync Video acceleration) (codec hevc)
>
ffmpeg -encoders -hide_banner | findstr /c:"265"
 V....D libx265              libx265 H.265 / HEVC (codec hevc)
>
The libx265 is the cpu based h.265 encoder. Supported features can be retrieved like this
ffmpeg -h encoder=libx265 -hide_banner
Encoder libx265 [libx265 H.265 / HEVC]:
    General capabilities: dr1 delay threads
    Threading capabilities: other
    Supported pixel formats: yuv420p yuvj420p yuv422p yuvj422p yuv444p yuvj444p gbrp yuv420p10le yuv422p10le yuv444p10le gbrp10le yuv420p12le yuv422p12le yuv444p12le gbrp12le gray gray10le gray12le
libx265 AVOptions:
  -crf               <float>      E..V....... set the x265 crf (from -1 to FLT_MAX) (default -1)
  -qp                <int>        E..V....... set the x265 qp (from -1 to INT_MAX) (default -1)
  -forced-idr        <boolean>    E..V....... if forcing keyframes, force them as IDR frames (default false)
  -preset            <string>     E..V....... set the x265 preset
  -tune              <string>     E..V....... set the x265 tune parameter
  -profile           <string>     E..V....... set the x265 profile
  -udu_sei           <boolean>    E..V....... Use user data unregistered SEI if available (default false)
  -x265-params       <dictionary> E..V....... set the x265 configuration using a :-separated list of key=value parameters

>
Supported chroma color spaces includes 4:2:0, 4:2:2 and 4:4:4 with color depth 8, 10 and 12. This codec has nearly all the features for good compression and delivery read format.
For cpu based encoding VP9 is implemented via the libvpx-vp9 codec in ffmpeg. For gpu based encoding we have hevc_amf (amd), hevc_nvenc(nvidia), hevc_qsv (intel). Encoding in the h265 codec will be slow (when using cpu) since it applies high quality compression.
ffmpeg -hide_banner -y -i .\costa_rica_4k_60fps_hdr_uhd.webm -c:v libx265 -ss 5 -t 15 costa-10s.lib265.mp4
On my system, VLC player could use nvidia rtx3060 laptop for hardware accelerated decoding of h265 video.
Nvidia NVENC: To encode with nvidia nvenc use the following command:
ffmpeg -hide_banner -y -i .\costa_rica_4k_60fps_hdr_uhd.webm -c:v hevc_nvenc -ss 5 -t 15 costa-10s.hevc_nvenc.mp4
To preserve the source quality as close as possible, here is a neat trick that works with hevc_nvenc encoder. Setting the bitrate to 0 makes the encoder automatically follow the source video bitrate as closely as possible, keeping the quality nearly the same as in the source video
ffmpeg -hide_banner -y -i .\costa_rica_4k_60fps_hdr_uhd.webm -c:v hevc_nvenc -b:v 0 -ss 5 -t 15 costa-10s.hevc_nvenc.mp4
8. VP9
This codec was developed by google to compete with the HEVC / H.265 codec and is used to serve HDR and 4k/8k videos on youtube. VP9 is the successor of vp8. To check supported vp9 encoders in ffmpeg, run the following command:
> ffmpeg -encoders -hide_banner | findstr /c:"vp9"
 V....D libvpx-vp9           libvpx VP9 (codec vp9)
 V..... vp9_qsv              VP9 video (Intel Quick Sync Video acceleration) (codec vp9)
>
The first codec, libvpx-vp9 is the cpu based encoder, whereas vp9_qsv is the intel gpu based encoder. On this particular machine I have nvidia rtx 3060 Laptop gpu which supports vp9 decoding only but not encoding. According to the gpu matrix the 4000 series of nvidia gpus have support for av1 encoding which is the successor of vp9.
9. AV1 - AOMedia Video 1
The av1 video codec is a the successor of vp9 and uses containers webm or mkv. Its supports both lossy and lossless encoding modes. Its used by youtube to serve 4k/8k hdr videos.
FFmpeg supports encoding with this codec.
> ffmpeg -encoders -hide_banner | findstr /c:"av1"
 V....D libaom-av1           libaom AV1 (codec av1)
 V....D librav1e             librav1e AV1 (codec av1)
 V..... libsvtav1            SVT-AV1(Scalable Video Technology for AV1) encoder (codec av1)
 A..... wmav1                Windows Media Audio 1
>
As we can see above, there are actually 3 different encoders for this codec namely, aom-av1, rave1e and svtav1. Hardware accelerated av1 encoding is supported only by 4000 series nvidia gpus.
aom-av1
To encode into AV1 format with aom-av1 use the following command:
ffmpeg -hide_banner -y -i .\peru-4k-sdr.libx264.mp4 -c:v libaom-av1 -aom-params lossless=1 "peru-4k-sdr.av1.mp4"
Very Slow Encoding: By default the encoding process with libaom-av1 (cpu based) will be very very slow, and consume a lot of cpu processing power (25-50% on 5800H). To speed up the process set the option "cpu-used" to 8.
ffmpeg -hide_banner -y -i .\peru-4k-sdr.libx264.mp4 -c:v libaom-av1 -cpu-used 8 -ss 0 -t 10 "peru-4k-sdr.av1.webm"
This will speed up and bring down the encoding time to acceptable levels, though it would still be far slower compared to h264. The cpu utilization was low at around 50% when compressing with libaom-av1. Higher utilization might have delivered faster encoding. The algorithm does not seem to be efficient.
rav1e
This librav1e encoder is another alternative, but is slow just like libaom-av1.
ffmpeg -hide_banner -y -i .\peru-4k-sdr.libx264.mp4 -c:v librav1e -ss 0 -t 10 "peru-4k-sdr.librav1e.mp4"
It uses around 10% of the cpu (5800H) by default. Had to use other options to speed the encoding process.
svtav1
The libsvtav1 encoder yielded much better performance and results. The encoding process was fast, like h.264 and cpu usage was high.
ffmpeg -hide_banner -y -i .\peru-4k-sdr.libx264.mp4 -c:v libsvtav1 -speed 10 -ss 0 -t 10 "peru-4k-sdr.libsvtav1.mp4"
Out of the 3, svtav1 seems to be the most practically usable. Handbrake video transcoder also uses svt for av1 encoding.
10. Gopro Cineform
Cineform is another intermediate codec that is designed for video editing, specially high resolution videos. It produces really large size files and use containers like avi and mov.
To convert a video to GoPro CineForm format with ffmpeg use the cfhd codec.
ffmpeg -hide_banner -y -i .\peru-4k-sdr.libx264.mp4 -c:v cfhd -ss 0 -t 10 peru.cform.mov
Hardware Acceleration with Encoders
The following command shows the supported hardware acceleration options available.
> ffmpeg -hwaccels -hide_banner
Hardware acceleration methods:
cuda
dxva2
qsv
d3d11va
opencl
vulkan
>
More details available at this page on ffmpeg.
Note about HDR
If your source video is using HDR, then you will likely run into problems with some codecs that do not support HDR. HDR uses 10-bit colors, bt2020 colorspace and smpte2084 color transfer function, which not all codecs will support. For example h264_amf (amd hardware based encoder does not support it).
CPU based encoders like libx264 or libx265 work best with hdr. So with hdr your codec options are limited.
Any codec or encoder not capable of using hdr file as input, or outputting hdr will either fail to encode or result in an output file with washed out (pale/faded) colors that would look very different from the original source video.
Many more codecs
Here is a bigger list of codecs, many of which we have covered above. Most of these codecs are supported by FFmpeg and other transcoding applications like Handbrake and Shutter Encoder.
Editing Codecs:
DNXHD
DNxHR
Apple Prores
Apple QuickTime Animation
GoPro CineForm
HuffYUV
MJPEG
UT Video
Distribution/Delivery Codecs:
H.264
H.265
VP8
VP9
AV1
OGV
MPEG-4
MPEG-2
Codecs for Storage/Archiving:
FFV1
UT Video
Some Old Codecs:
MPJEG
Xvid
WMV
MPEG-1
DV PAL
Conclusion
Each codec has its own advantages and disadvantages. For example H.264, H.265 provide higher compressions without compromising quality, but consequently need more complex and intensive processing for decoding the video for playback.
On the other side codecs like UT Video, MJPEG generate large sized video files, but require much less cpu power to decode the video. These codecs are ideal for video editing as they load quickly in video editing applications and can handle operations like timeline preview and scrubbing without any lags. These codecs often times use only "intra-frame coding" (each frame is compressed without any dependency on adjacent frames) and are also known as intermediate (Mezzanine) codecs.
Some codecs are more suitable for hdr support and 10/12 bit colors whereas some codecs do not support these features. Some codecs like FFV1 are suitable for video storage at original quality, whereas some are suitable for delivery/distribution and/or live streaming.
Links and Resources
Data on Nvidia NVENC/NVDEC support in various gpus:
https://developer.nvidia.com/video-encode-and-decode-gpu-support-matrix-new
FFmpeg documentation of all codecs:
https://ffmpeg.org/ffmpeg-codecs.html